

Chapter 12: Characterization of Neisseria meningitidis, Haemophilus influenzae, and Streptococcus pneumoniae by Molecular Typing Methods
 ShareCompartir
Printer friendly version [57 pages]
- Introduction
A number of DNA-based molecular typing methods have been used in epidemiological investigations of bacterial pathogens and studying bacterial population genetics and evolution. Some methods are suitable for characterizing strains that cause localized outbreaks; others are particularly useful for determining the long-term relationships of strains and their population structures (1). For local outbreak investigation, molecular typing methods with a high degree of resolution are necessary to detect subtle differences in what most likely are genetically related strains. These assays are also useful for detecting changes in molecular type during prolonged outbreaks. Highly discriminatory assays typically index genomic variations that accumulate rapidly and can be used to detect microvariations that can be used to identify strains circulating in a specific geographic area. The methods that have been used for this purpose including ribotyping, random amplified polymorphic DNA, fluorescent amplified-fragment length polymorphism, restriction fragment length polymorphism (RFLP), multiple-locus variable-number tandem repeat analysis (MLVA) and pulsed-field gel electrophoresis (PFGE). The high resolution of these assays will sometimes resolve subtle differences that MLST cannot, thus they are particularly useful for studying local epidemiology or tracing the spread of highly related strains during outbreaks/clusters of cases (1, 7, 15).
PFGE is one of the most widely used molecular typing methods because of the resolving power of the technique. In brief, PFGE uses a restriction enzyme to cut genomic DNA infrequently at a specific sequence to produce a number of fragments that are then size-fractionated on an agarose gel. The resultant banding patterns are analyzed and compared to other isolates. During an outbreak or a cluster of cases, PFGE is used in combination with epidemiologic information and other typing techniques to help identify outbreak isolates and determine the relationships among the isolates. A promising technique with similar discriminatory capabilities that is gaining acceptance is multiple-locus variable-number tandem repeat analysis (MLVA). In MLVA, the variability in the numbers of short tandem repeat sequences that are found in specific areas of the genome are utilized to create DNA fingerprints for epidemiological studies. Once the appropriate loci are established, MLVA yields clustering similar to PFGE (13) and the use of highly variable-number tandem repeats results in a high degree of differentiation with suitable resolution to discriminate between strains in an outbreak or cluster (24, 34).
Tracking the population biology of bacterial organisms on a global or even national scale requires a molecular typing method based on slowly accumulating selectively neutral genetic variations that will still distinguish between genotypes yet can identify clonal groups. One of the most common selectively neutral areas of a genome are housekeeping genes encoding proteins involved in the metabolism of the organism. The first molecular typing method to utilize this attribute was multilocus enzyme electrophoresis (MLEE). MLEE analyses the electrophoretic mobilities of metabolic housekeeping enzymes on a starch gel and equates changes in mobility of each enzyme with allelic variants of each loci (1, 7). In order to obtain high resolution, 20 or more loci are analyzed for each isolate. The genetic variation leading to the changes necessary to cause mobility shifts are thought to be selectively neutral, thus the electrophoretic type of a bacterial clone should be relatively stable over time (7). MLEE was instrumental as a typing method in early global epidemiology studies and population biology analysis, but the method is technically demanding, and because MLEE is gel-based, results between laboratories are very difficult to compare.
In 1998, Maiden et al developed a DNA-based method of molecular typing N. meningitidis that retained the concepts utilized by MLEE of analyzing housekeeping genes not under any known immunologic selection. MLST defines strains by their allelic profiles determined from the nucleotide sequences of internal fragments of seven housekeeping genes rather than by shifting electrophoretic mobility patterns of the enzymes they encode (15). This approach has been adapted for use in typing many types of bacteria, including H. influenzae, and S. pneumoniae, and is now the most widely used method for molecular typing. While MLST is more expensive to perform, it has the following advantages over MLEE:
- Directly measures genetic variations, and therefore resolves more alleles per locus
- Is readily scalable and adaptable for a high throughput format
- Sequence data is reproducible and can be objectively compared between laboratories
- Sequence analysis can be performed remotely and the results returned via the internet
- Sequence data can be uploaded to a centralized database and is accessible to all scientists via the internet to produce a powerful tool for global epidemiology
- Information can be obtained from PCR amplification from clinical material
MLST is not suitable to use to characterize potential differences in strains within an outbreak as its power to resolve small evolutionary differences is too low. Therefore, to provide further discriminatory power, MLST data can be combined with PFGE and sequence data from other more variable loci under positive selective pressure, such as PorA, PorB, FetA, and fHbp in N. meningitidis, and the penicillin binding proteins (PBPs) and PspA in S. pneumoniae. It is this variability that makes these proteins excellent markers for short-term epidemiology investigations. Sequence data for these markers is also valuable for assessing the allelic distribution of these vaccine candidate proteins that can aid in rational vaccine design.
- Multilocus sequence typing (MLST) and typing of other variable genes of N. meningitidis, H. influenzae, and S. pneumoniae
The PCR primers and protocols included here are used at CDC and work well. However, many laboratories use different PCR reaction protocols, chemistries, buffers, primer concentrations and even different equipment for PCR amplification and DNA sequencing. Other protocols work well and it is up to the discretion of each laboratory to discern the optimal reagents and assay conditions for their laboratory, including appropriate validation and quality control.
The primers listed in this manual have been designed and optimized over time as more sequence data has become available. By comparing DNA sequences for a given area of interest from dozens to hundreds of different strains of N. meningitidis, H. influenzae, or S. pneumoniae, small areas of homology can be detected that provide an area from which PCR and DNA sequencing primers can be designed that have the greatest likelihood of working. In some instances, a perfect consensus cannot be found which will react with all strains. In these cases, degenerate primers are designed that have a mix of nucleotides at a certain position. For example, when either a "C" or a "T" nucleotide can occupy a position, the International Union of Pure and Applied Chemistry (IUPAC), designates it as "Y". For a complete list of IUPAC nucleotide abbreviations, see: http://www.chem.qmul.ac.uk/iupac/.
- Preparation of DNA template
For each of the assays described below a preparation of DNA must be extracted. A pure culture of each isolate is grown on trypticase soy agar plates supplemented with 5% sheep blood for N. meningitidis and S. pneumoniae, or chocolated agar plates supplemented with hemin and NAD for H. influenzae in a humidified incubator for 18-24 hours at 37°C with 5% CO2. Fast DNA extraction protocols for N. meningitidis, H. influenzae, and S. pneumoniae can be found in Appendix 1 at the end of this chapter. Additional methods for DNA extraction that will provide purified DNA can be found in Chapter 10: PCR Methods or commercially available DNA extraction kits can be used.
- Multilocus Sequence Typing (MLST)
- Overview and MLST schemes for N. meningitidis, H. influenzae, and S. pneumoniae
The housekeeping genes selected for MLST are not closely linked in bacterial genomes and have conserved sequence regions that are sufficient to design PCR primers that will amplify all or nearly all of the isolates. The number of housekeeping genes to be examined reflects an optimal balance between resolution of genotypes and laboratory workload. The internal fragments are of a length to provide sufficient variation for identification of different alleles and for each strand to be accurately sequenced using only a single primer for each direction. Sequences that differ by even a single nucleotide are considered unique and no weight is given to the number of nucleotide changes in a given allele. Each unique allele is assigned a number in order of discovery and each isolate can be characterized by its multilocus genotypic or allelic profile, designated as sequence type (ST), which is the combination of its alleles over the seven genetic loci. STs can be further grouped into clonal complexes (CC), which are defined in the Neisseria MLST profile database as a group of STs that share at least four of the seven loci in common with a central ST (30).
MLST schemes have been developed for N. meningitidis (15) (Table 1), H. influenzae (20) (Table 2), S. pneumoniae (7) (Table 3) and many others (see http://www.mlst.net/). Each scheme uses defined regions of seven housekeeping genes. A general protocol for performing MLST and analyzing the data is given below.
Table 1. N. meningitidis MLST scheme, including gene locus, amplicon length, and trimmed length of sequence used for allelic determination
Housekeeping genes Gene locus Trimmed length Putative ABC transporter abcZ 433 Adenylate kinase adk 465 Shikimate dehydrogenase aroE 490 Fumurate dehydrogenase fumC 465 Glucose-6-phosphate dehydrogenase gdh 501 Pyruvate dehydrogenase subunit pdhC 480 Phosphoglucomutase pgm 450 Table 2. H. influenzae MLST scheme, including gene locus, amplicon length, and trimmed length of sequence used for allelic determination
Housekeeping genes Gene locus Trimmed length Adenylate kinase adk 477 ATP synthase F1 subunit gamma atpG 447 Fumarate reductase iron-sulfur protein frdB 489 Fuculokinase fucK 345 Malate dehydrogenase mdh 405 Glucose-6-phosphate isomerase pgi 468 RecA protein recA 426 Table 3. S. pneumoniae MLST scheme, including gene locus, amplicon length, and trimmed length of sequence used for allelic determination
Housekeeping genes Gene locus Trimmed length Shikimate dehydrogenase aroE 405 Glucose-6-phosphate dehydrogenase gdh 460 Glucose kinase gki 483 Transketolase recP 450 Signal peptidase I spi 474 Xanthine phosphoribosyltransferase xpt 486 D-alanine-D-alanine ligase ddl 441 Table 4. MLST amplification primers for N. meningitidis
Gene locus Primer name Forward primer (5'-3') Primer name Reverse primer (5'-3') abcZ abcZ-P1C TGTTCCGCTTCGACTGCCAAC abcZ-P2C TCCCCGTCGTAAAAAACAATC adk adk-P1B CCAAGCCGTGTAGAATCGTAAACC adk-P2B TGCCCAATGCGCCCAATAC aroE aroE-P1B TTTGAAACAGGCGGTTGCGG aroE-P2B CAGCGGTAATCCAGTGCGAC fumC fumC-P1B TCCCCGCCGTAAAAGCCCTG fumC-P2B GCCCGTCAGCAAGCCCAAC gdh gdh-P1B CTGCCCCCGGGGTTTTCATCT gdh-P2B TGTTGCGCGTTATTTCAAAGAAGG pdhC pdhC-P2B CCGGCCGTACGACGCTGAAC pdhC-P2B GATGTCGGAATGGGGCAAACA pgm pgm-P1 CTTCAAAGCCTACGACATCCG pgm-P2 CGGATTGCTTTCGATGACGGC Table 5. MLST amplification primers for H. influenzae
Gene locus Primer name Forward primer (5'-3') Primer name Reverse primer (5'-3') adk adk-up GGTGCACCGGGTGCAGGTAA adk-dn CCTAAAGATTTTATCTAACTC atpG atpG-up ATGGCAGGTGCAAAAGAGAT atpG-dn TTGTACAACAGGCTTTTGCG frdB frdB-up CTTATCGTTGGTCTTGCCGT frdB-dn TTGGCACTTTCCACTTTTCC fucK fucK-up ACCACTTTCGGCGTGGATGG fucK-dn AAGATTTCCCAGGTGCCAGA mdh mdh-up TCATTGTATGATATTGCCCC mdh-dn ACTTCTGTACCTGCATTTTG pgi pgi-up GGTGAAAAAATCAATCGTAC pgi-dn ATTGAAAGACCAATAGCTGA recA recA-up ATGGCAACTCAAGAAGAAAA recA-dn TTACCAAACATCACGCCTAT Table 6. MLST amplification primers for S. pneumoniae
Gene locus Primer name Forward primer (5'-3')1,2 Primer name Reverse primer (5'-3')1,2 aroE3 aroE-fwd TCCTATTAAGCATTCTATTT
CTCCCTTCaroE-rev ACAGGAGAGGATTGGCCATCCA
TGCCCACACTGgdh4 gdh-up ATGGACAAACCAGCNAGYTT gdh-dn GCTTGAGGTCCCATRCTNCC gki4 gki-up GGCATTGGAATGGGATCACC gki-dn TCTCCCGCAGCTGACAC recP3 recP-fwd GAATGTGTGATTCAATAATCACCTC
AAATAGAAGGrecP-rev TGCTGTTTCGATAGCAGCA
TGGATGGCTTCCspi3 spi-fwd CGCTTAGAAAGGTAAGTTA
TGAATTTspi-rev GAAGAGGCTGAGATTGGTG
ATTCTCGGCCxpt3 xpt-fwd TTAACTTTTAGACTTTAGGA
GGTCTTATGxpt-rev CGGCTGCTTGCGAGTGTT
TTTCTTGAGddl3 ddl-fwd TAAAATCACGACTAAGCGTGTTCTGG ddl-rev AAGTAGTGGGTACATAGA
CCACTGGG
Footnotes
1IUPAC nucleotide designations: R = A or G; Y = C or T; N = A, T, G, or C.
2In this instance, R = equal mixture of A and G; W = equal mixture of A and T; etc.
3 The primers for aroE, recP, spi, xpt, and ddl listed at http://spneumoniae.mlst.net/misc/info.asp#experimental are too close to the target sequences for accurate sequencing results using a capillary sequencer, thus alternative primers that lie about 40 bases further upstream and downstream of the target sequences are listed above. See also primers on CDC site.
4Primer sequence taken from: http://spneumoniae.mlst.net/misc/info.asp#experimental. - Primers used for PCR amplification
The primers used for PCR amplification for each scheme are shown in Table 4 (N. meningitidis), Table 5 (H. influenzae), and Table 6 (S. pneumoniae). In addition, the primers currently in use are listed in the MLST web pages for the schemes, http://pubmlst.org/neisseria/ look under "information", and http://haemophilus.mlst.net/, look under "Organism Specific Information" and go to page 2. Note that for S. pneumoniae, the primers listed are from two different sources. The original MLST primers for S. pneumoniae can be found at http://spneumoniae.mlst.net/misc/info.asp#experimental. However, it has been found that these primers for aroE, recP, spi, xpt, and ddl are too close to the target sequences for accurate sequencing results using a capillary sequencer, thus alternative primers that lie about 40 bases further upstream and downstream of the target sequences were designed.
- PCR reaction setup and cycling conditions
The PCR conditions to be used for each scheme are given below (Tables 7 and 8). PCR set up and cycling conditions for each assay can also be found at http://pubmlst.org/neisseria/ look under "information", and http://haemophilus.mlst.net/ or http://spneumoniae.mlst.net/, look under "Organism Specific Information".
Reactions are performed in 50 µl volumes for N. meningitidis and H. influenzae, and in 25 µl volumes for S. pneumoniae in either in 8-well tube strips or in 96-well plates. If doing many reactions, it is useful to prepare a master mix of reagents equal to the number of reactions plus one for each locus with all components except for the DNA. When setting up the PCR reactions keep the reagents from warming up to room temperature by keeping them on ice. This is especially important for the Taq DNA polymerase.
Table 7. MLST PCR amplification reaction set-up for N. meningitidis and H. influenzae
Reagent Volume (µl)* Comments PCR grade water 40.5 10X buffer 5.0 10 mM dNTPs 1.0 200 µM final concentration 20 mM forward primer 1.0 0.4 µM final concentration 20 mM reverse primer 1.0 0.4 µM final concentration DNA polymerase 0.5 Template DNA 1.0 Final volume 50.0
Footnotes
* Some laboratories scale back the reaction volumes to 25 µl. Adjust each component of the reaction accordingly if 25 µl volumes are desired.
Table 8. MLST PCR amplification reaction set-up for S. pneumoniae
Reagent Volume (µl) Comments PCR grade water 18.0 - 19.5 10X buffer 2.5 10 mM dNTPs 0.5 200 µM final concentration 20 µM forward primer 0.5 0.2 µM final concentration 20 µM reverse primer 0.5 0.2 µM final concentration DNA polymerase 0.5 Template DNA 1 – 2.5 Final volume 25.0 Once the PCR reactions are set-up, immediately place them in the PCR machine and run. The cycling conditions for MLST differ slightly for each organism (Table 9, N. meningitidis, except for pgm; Table 10, N. meningitidis, pgm; Table 11, H. influenzae; and Table 12, S. pneumoniae). Note that the annealing temperature of the reactions may need to be optimized when adapting the protocols for use in your laboratory.
Table 9. PCR cycling conditions for N. meningitidis MLST amplifications, except for pgm
1x (94°C, 4 min) 35x (94°C, 1 min); (55°C, 1 min); (72°C, 1 min) 1x (72°C, 5 min) 1x (4°C, ∞) Table 10. PCR cycling conditions for pgm gene for N. meningitidis MLST amplifications
1x (95°C, 5 min) 30x (94°C, 1 min); (65°C, 1 min)*; (72°C, 1 min)
*Decrease the annealing temperature 0.5°C per cycle10x (94°C, 1 min); (50°C, 1 min); (72°C, 2 min) 1x (72°C, 5 min) 1x (4°C, ∞) 1x (72°C, 2 min) 1x (4°C, ∞) Table 11. PCR cycling conditions for H. influenzae MLST amplifications
1x (95°C, 4 min) 30x (95°C, 30 sec); (55°C, 30 sec)*; (72°C, 1 min)
*Use 50°C for adk and frdB genes1x (72°C, 10 min) 1x (4°C, ∞) Table 12. PCR cycling conditions for S. pneumoniae MLST amplifications
1x (94°C, 5 min) 10x (94°C, 15 sec); (54°C, 30 sec); (72°C, 45 sec) 20x (94°C, 15 sec); (54°C, 30 sec); (72°C, 45 sec)*
*Add 10 sec to the extension per cycle1x (72°C, 10 min) 1x (4°C, ∞) - Analysis of PCR products on an agarose gel
It is useful to check for a successful PCR amplification before moving onto reaction clean-up and sequencing. The protocol for analyzing the amplified PCR products can be found in Appendix 2 at the end of this chapter.
- Nucleotide sequencing of MLST PCR products
To perform DNA nucleotide sequencing, the DNA amplicons must be purified by the method of choice before sequencing reactions can be performed. These include gel filtration columns, a solid phase reversible immobilization magnetic bead-based system, or PEG8000/2.5M NaCl precipitation. Commercial kits for gel filtration columns are available from several companies and a protocol for PEG precipitation can be found at http://pubmlst.org/neisseria/ under "information" then "PCR protocol".
The PCR primers and protocols included here are those used at CDC and are optimized for these laboratories. Other protocols work well and it is up to the discretion of each laboratory to discern the optimal reagents and assay conditions for their laboratory, including appropriate validation and quality control. For a commonly used protocol, see: http://pubmlst.org/neisseria/ under "information" then "sequencing protocol (microtiter plates)".
Sequencing reactions for all assays described here should be carried out on both strands. Sequencing each strand provides greater confidence in the base calls versus having base calls made using a single data point.
-
Sequencing primers for N. meningitidis, H. influenzae, and S. pneumoniae MLST
For H. influenzae and S. pneumoniae, the same primers used for PCR amplification are used for sequencing reactions. The sequencing primers used for N. meningitidis MLST are in Table 13.
Table 13. MLST sequencing primers for N. meningitidis
Gene locus Primer name Forward primer (5'-3')1,2 Primer name Reverse primer (5'-3')1,2 abcZ abcZ-S1A AATCGTTTATGTACCGCAGR abcZ-S2 GAGAACGAGCCGGGATAGGA adk adk-S1A AGGCWGGCACGCCCTTGG adk-S2 CAATACTTCGGCTTTCACGG aroE aroE-S1A TCGGTCAAYACGCTGRTK aroE-S2 ATGATGTTGCCGTACACATA fumC fumC-S1 TCCGGCTTGCCGTTTGTCAG fumC-S2 TTGTAGGCGGTTTTGGCGAC gdh gdh-S3 CCTTGGCAAAGAAAGCCTGC gdh-S4C RCGCACGGATTCATRYGG pdhC pdhC-S1 TCTACTACATCACCCTGATG pdhC-S2 ATCGGCTTTGATGCCGTATTT pgm pgm-S1 CGGCGATGCCGACCGCTTGG pgm-S2A GGTGATGATTTCGGTYGCRCC
Footnotes
1IUPAC nucleotide designations: R = A or G; W = T or A; K = T or G; Y = C or T; N = A, T, G, or C.
2In this instance, R = equal mixture of A and G; W = equal mixture of A and T; etc.
- Sequencing PCR setup and cycling conditions
Reactions are performed in 20 µl volumes either in 8-well tube strips or in 96-well plates. Some laboratories perform sequencing reactions in 10 µl volumes. Adjust each component of the reaction accordingly if 10 µl volumes are desired. If doing many reactions, it is useful to prepare a master mix of reagents equal to the number of reactions plus one for each locus with all components except for the DNA. The setup in Table 14 will work for sequencing MLST amplicons from N. meningitidis, H. influenzae, and S. pneumoniae.
Table 14. MLST sequencing PCR reaction set-up
Reagent Volume (µl) Comments PCR grade water 11.0 5X buffer 4.0 Terminator nucleotides and polymerase* 1.0 200 mM final concentration 3.2 mM primer 1.0 0.16 mM final concentration Purified amplicon DNA 3.0 Final volume 20.0 *Note: chemistries can vary, thus optimize the reactions for your particular system. Primer concentrations and PCR set up parameters may vary depending on the type of enzyme, chemistry, and protocols used in individual laboratories. Each laboratory should optimize the protocols.
Once the reactions are setup, follow the cycling conditions in Table 15.
Table 15. Cycling conditions for sequencing PCR
25x (95°C, 10 sec); (52°C, 5 sec); (60°C, 4 min) 1x (4°C, ∞) - Purification of the sequencing reaction products
Before the reaction products can be resolved on an automated DNA sequencer, the products must be purified to remove unincorporated fluorescent dyes, buffer, and unused deoxyribonucleotide triphosphates. This can be achieved using a variety of commercially available kits that utilize gel filtration or a solid phase reversible immobilization magnetic bead-based system to purify the products. Conversely, the reaction products can be purified by precipitation with ethanol and 3M sodium acetate, pH 4.6 (see http://pubmlst.org/neisseria/ and click on "information" then "sequencing protocol (microtiter plates)". Typically, the reaction products will be purified and dried down in a 96-well plate and reconstituted with formamide, EDTA, or water before electrophoresis. Each laboratory should follow the manufacturer’s protocol for the automatic sequencer system being employed.
See the Analysis of Sequence Data and Allele Determination section below for further information about data analysis.
- Overview and MLST schemes for N. meningitidis, H. influenzae, and S. pneumoniae
- porA and porB typing
- Overview
The antigenic diversity expressed by the five major classes of outer membrane proteins (OMP) on the surface of N. meningitidis have been utilized to develop isolate subtyping and characterization schemes and to develop vaccines. The largest of the OMPs expressed by most meningococcal isolates is the PorA or class 1 protein. The PorA protein is a transmembrane protein predicted to have 8 loops exposed on the surface of the organism. These loops contain two hypervariable regions, VR1 (loop 1) and VR2 (loop 4), and two semivariable regions, SV1 (loop 5) and SV2 (loop 6). Sequence analysis of SV1 and SV2 demonstrated that sequence differences in these regions were too limited to generate subtype differences between strains, thus PorA typing is based on the VR1 and VR2 hypervariable sequences, which have greater resolution (16, 19).
Additionally, all N. meningitidis express PorB which is expressed as 2 alternate alleles that were previously called class 2 and 3 proteins. These have been named PorB2 and PorB3, respectively, and are mutually exclusive, though hybrids do exist. PorB has four hypervariable loop regions referred to as VR1, on loop I; VR2, on loop V; VR3, on loop VI; and VR4, on loop VII (32). Historically, serotyping is based on the reactivity of specific antisera to the variable regions of PorB. The antigenically important variable epitopes that are targeted by serological typing reagents reside in the surface-exposed loops of PorA and PorB (29, 31). In addition, these regions are targeted by the host immune response and are thus under intensive selective pressure. Subtyping isolates based on sequencing of the porA and porB genes and translation of the DNA into their respective amino acids for typing has been helpful in characterizing isolates in clusters or outbreaks and for determining differences between isolates. Note that the porA gene is deleted in some isolates, though this is a rare occurrence (32).
- Primers used for PCR amplification
The primers used for PCR amplification of the porA and porB genes of N. meningitidis are shown in Table 16. Primer set 1 should be used first when amplifying the porA gene. If PCR amplification fails using primer set 1; alternative primer sets 2 and/or 3 should be used.
- PCR reaction setup and cycling conditions
Reactions are performed in 50 µl volumes either in 8-well tube strips or in 96-well plates (Table 17). If doing many reactions, it is useful to prepare a master mix of reagents equal to the number of reactions plus one for each locus with all components except for the DNA.
Table 16. PCR primers for porA and porB amplification
Gene Set Forward primer 5'-3' Reverse primer 5'-3' 1GenBank Accession # 2Amplicon size (nts) porA 1 P14 GGGTGTTTGCCCG
ATGTTTTTAGGP22 TTAGAATTTGTGGCG
CAAACCGACX12899 1236 porA 23 P21 CTGTACGGCGAAATCA
AAGCCGGCGTP22 TTAGAATTTGTGGC
GCAAACCGACEF564254 1115 porA 33 U23 GTGTTTGCCCGATGT
TTTTAGGTL24 TGCTGTCTTTATTGCC
GTTTTTCTX12899 1368 porB 1 PB-A1 TAAATGCAAAGCTA
AGCGGCTTGPB-A2 TTTGTTGATACCAA
TCTTTTCAGEU301792 1755
Footnotes
1The GenBank Accession number given may not be that of the strain actually used to design the PCR primers, but it is a strain that contains the primer sequences.
2These are the predicted amplicon sizes for the strain with the given GenBank Accession number. Because of the variable nature of these genes, the amplicon in other strains may differ from the size listed. porA is deleted in some strains, though deletions are rare.
3Primers sets 2 and 3 are alternate primer sets that can be used when the porA gene does not amplify with primer set 1.Table 17. porA and porB PCR amplification reaction set-up
Reagent Volume (µl)* Comments PCR grade water 40.5 10X buffer 5.0 10 mM dNTPs 1.0 200 µM final concentration 20 µM forward primer 1.0 0.4 µM final concentration 20 µM reverse primer 1.0 0.4 µM final concentration DNA polymerase 0.5 Template DNA 1.0 Final volume 20.0
Footnotes
*Some laboratories scale back the reaction volumes to 25 µl. Adjust each component of the reaction accordingly if 25 µl volumes are desired.
Once the PCR reactions are set-up, immediately place them in the PCR machine and run. The cycling conditions for porA and porB differ slightly for each assay (Table 18 for porA and Table 19 for porB). Note that the annealing temperature of the reactions may need to be optimized when adapting the protocols for use in your laboratory.
Table 18. Cycling conditions for porA amplification
1x (95°C, 5 min) 30x (95°C, 1 min); (60°C, 30 sec); (72°C, 2 min) 1x (72°C, 5 min) 4°C, ∞ Table 19. Cycling conditions for porB amplification
1x (94°C, 5 min) 35x (94°C, 1 min); (60°C, 30 sec); (72°C, 1 min) 1x (72°C, 5 min) 4°C, ∞ - Analysis of PCR products on an agarose gel
It is useful to check for a successful PCR amplification before moving onto reaction clean-up and sequencing. The protocol analyzing the amplified PCR products can be found in Appendix 2 at the end of this chapter.
- Nucleotide sequencing of porA and porB PCR products
To perform DNA nucleotide sequencing, the DNA amplicons must be purified by the method of choice before sequencing reactions can be performed. These include gel filtration columns, a solid phase reversible immobilization magnetic bead-based system, or PEG8000/2.5M NaCl precipitation. Commercial kits for gel filtration columns are available from several companies and a protocol for PEG precipitation can be found at http://pubmlst.org/neisseria/ under "information" then "PCR protocol".
The PCR primers and protocols included here are those used at CDC and are optimized for these laboratories. Other protocols work well and it is up to the discretion of each laboratory to discern the optimal reagents and assay conditions for their laboratory, including appropriate validation and quality control. For a commonly used protocol, see: http://pubmlst.org/neisseria/ under "information" then "sequencing protocol (microtiter plates)".
Sequencing reactions for all assays described here should be carried out on both strands. Sequencing each strand provides greater confidence in the base calls versus having base calls made using a single data point.
- Sequencing primers for porA and porB typing
The primers used to sequence the porA (Table 20) and porB (Table 21) amplicons are shown. VR1 of porA can be determined by using primers U86 and R435 and VR2 can be determined by using F435 and R773. To determine the class of the PorB protein, all seven of the primers listed in the chart for porB must be used.
Table 20. Sequencing primers for porA
Gene Forward primer 5'-3' Reverse primer 5'-3' porA
VR1U86
GCCCTCGTATTGTCCGCACTGR435
TTGCTGTCCCAAGGATCAATGGCporA
VR2F435
GCCATTAATCCTTGGGACAGCAAR773
GGCATAGTTCCCGGCAAAACCGCCATTable 21. Sequencing primers for porB
Gene Forward primer 5'-3' Reverse primer 5'-3' porB PB-S1
GCAGCCCTTCCTGTTGCAGCPB-S2
TTGCAGATTAGAATTTTGTGporB 8U
TCCGTACGCTACGATTCTCC8L
GGAGAATCGTAGCGTACGGAporB 244U
CGCCCCGCGTTTCTTACG244L
CGTAAGAAACGCGGGGCGporB PB260
AGTGCGTTTGGAGAAGTCGT - Sequencing PCR setup and cycling conditions
Reactions are performed in 20 µl volumes either in 8-well tube strips or in 96-well plates. Some laboratories perform sequencing reactions in 10 µl volumes. Adjust each component of the reaction accordingly if 10 µl volumes are desired. If doing many reactions, it is useful to prepare a master mix of reagents equal to the number of reactions plus one for each locus with all components except for the DNA. The sequencing PCR setup and cycling conditions are shown below in Tables 22 and 23, respectively.
Table 22. porA and porB sequencing PCR reaction set-up
Reagent Volume (µl) Comments PCR grade water 11.0 5X buffer 4.0 Terminator nucleotides and polymerase* 1.0 200 mM final concentration 3.2 mM primer 1.0 0.16 mM final concentration Purified amplicon DNA 3.0 Final volume 20.0 *Note: chemistries can vary, thus optimize the reactions for your particular system. Primer concentrations and PCR set up parameters may vary depending on the type of enzyme, chemistry, and protocols used in individual laboratories. Each laboratory should optimize the protocols.
Once the reactions are setup, follow the cycling conditions in Table 23.
Table 23. Cycling conditions for sequencing PCR
25x (95°C, 10 sec); (52°C, 5 sec); (60°C, 4 min) 1x (4°C, ∞) - Purification of the sequencing reaction products
Before the reaction products can be resolved on an automated DNA sequencer, the products must be purified to remove unincorporated fluorescent dyes, buffer, and unused deoxyribonucleotide triphosphates. This can be achieved using a variety of commercially available kits that utilize gel filtration or a solid phase reversible immobilization magnetic bead-based system to purify the products. Conversely, the reaction products can be purified by precipitation with ethanol and 3M sodium acetate, pH 4.6 (see http://pubmlst.org/neisseria/ and click on "information" and "sequencing protocol (microtiter plates)". Typically, the reaction products will be purified and dried down in a 96-well plate and reconstituted with formamide, EDTA, or water before electrophoresis. Each laboratory should follow the manufacturer’s protocol for the automatic sequencer system being employed.
See the Analysis of Sequence Data and Allele Determination section below for further information about data analysis.
- Overview
- fetA typing
- Overview
FetA (ferric enterobactin transport), formerly FrpB (iron-repressed protein B) is a 76 kDa iron-regulated OMP that is expressed to a high level during iron limitation (6). Modeling of the structure of FetA predicts 13 surface-exposed loops. Anti-FetA antibodies to the most variable of these loops have bactericidal properties (29). FetA has been proposed as a potential vaccine candidate. However, this region is highly variable which limits the potential of this antigen to be the sole component of a vaccine. Obtaining the amino acid sequence of this variable region by sequencing the DNA of this region of the fetA gene is useful in characterizing clones emerging or circulating in local populations (28). Note that the fetA gene is deleted in some isolates, though this is a rare occurrence (3, 17).
- Primers used for PCR amplification
The primers used for PCR amplification of the fetA gene of N. meningitidis are shown in Table 24.
- PCR reaction setup and cycling conditions
Reactions are performed in 50 µl volumes either in 8-well tube strips or in 96-well plates (Table 25). If doing many reactions, it is useful to prepare a master mix of reagents equal to the number of reactions plus one for each locus with all components except for the DNA.
Once the PCR reactions are set-up, immediately place them in the PCR machine and run. The cycling conditions for fetA are shown in Table 26. Note that the annealing temperature of the reactions may need to be optimized when adapting the protocols for use in your laboratory.
- Analysis of PCR products on an agarose gel
It is useful to check for a successful PCR amplification before moving onto reaction clean-up and sequencing. The protocol analyzing the amplified PCR products can be found in Appendix 2 at the end of this chapter.
- Nucleotide sequencing of fetA PCR products
To perform DNA nucleotide sequencing, the DNA amplicons must be purified by the method of choice before sequencing reactions can be performed. These include gel filtration columns, a solid phase reversible immobilization magnetic bead-based system, or PEG8000/2.5M NaCl precipitation. Commercial kits for gel filtration columns are available from several companies and a protocol for PEG precipitation can be found at http://pubmlst.org/neisseria/ under "information" then "PCR protocol".
The PCR primers and protocols included here are those used at CDC and are optimized for these laboratories. Other protocols work well and it is up to the discretion of each laboratory to discern the optimal reagents and assay conditions for their laboratory, including appropriate validation and quality control. For a commonly used protocol, see: http://pubmlst.org/neisseria/ under "information" then "sequencing protocol (microtiter plates)".
Sequencing reactions for all assays described here should be carried out on both strands. Sequencing each strand provides greater confidence in the base calls versus having base calls made using a single data point.
Table 24. PCR primers for fetA amplification
Gene Forward primer 5'-3' Reverse primer 5'-3' 1GenBank Accession # 2Amplicon size (nts) fetA S1 CGGCGCAAGCGTATTCGG S8 CGCGCCCAATTCGTAACCGTG AF439258 1189
Footnotes
1The GenBank Accession number given may not be that of the strain actually used to design the PCR primers, but it is a strain that contains the primer sequences.
2These are the predicted amplicon sizes for the strain with the given GenBank Accession number. Because of the variable nature of these genes, the amplicon in other strains may differ from the size listed. fetA is deleted in some strains, though it is rare (3, 17).Table 25. fetA PCR amplification reaction set-up
Reagent Volume (µl)* Comments PCR grade water 40.5 10X buffer 5.0 10 mM dNTPs 1.0 200 µM final concentration 20 µM S1 1.0 0.4 µM final concentration 20 µM S8 1.0 0.4 µM final concentration DNA polymerase 0.5 Template DNA 1.0 Final volume 50.0
Footnotes
* Some laboratories scale back the reaction volumes to 25 µl. Adjust each component of the reaction accordingly if 25 µl volumes are desired.
Table 26. Cycling conditions for fetA amplification
1x (95°C, 5 min) 40x (95°C, 1 min); (55°C, 1 min); (72°C, 2.5 min) 1x (72°C, 7 min) 4°C, ∞ - Sequencing primers for fetA typing
The primers used to sequence the fetA amplicon are shown in Table 27.
Table 27. PCR primers for fetA amplification
Gene Forward primer 5'-3' Reverse primer 5'-3' fetA S12 TTCAACTTCGACAGCCGCCTT S15 TTGCAGCGCGTCR*TACAGGCG - Sequencing PCR setup and cycling conditions
Reactions are performed in 20 µl volumes either in 8-well tube strips or in 96-well plates. Some laboratories perform sequencing reactions in 10 µl volumes. Adjust each component of the reaction accordingly if 10 µl volumes are desired. If doing many reactions, it is useful to prepare a master mix of reagents equal to the number of reactions plus one for each locus with all components except for the DNA. The sequencing PCR setup and cycling conditions are shown below in Tables 28 and 29, respectively.
Table 28. fetA sequencing PCR reaction set-up
Reagent Volume (µl) Comments PCR grade water 11.0 5X buffer 4.0 Terminator nucleotides and polymerase* 1.0 200 µM final concentration 3.2 µM primer 1.0 0.16 µM final concentration Purified amplicon DNA 3.0 Final volume 20.0
Footnotes
* Note: chemistries can vary, thus optimize the reactions for your particular system. Primer concentrations and PCR set up parameters may vary depending on the type of enzyme, chemistry, and protocols used in individual laboratories. Each laboratory should optimize the protocols.
Once the reactions are setup, follow the cycling conditions in Table 29.
Table 29. Cycling conditions for sequencing PCR
25x (95°C, 10 sec); (52°C, 5 sec); (60°C, 4 min) 1x (4°C, ∞) - Purification of the sequencing reaction products
Before the reaction products can be resolved on an automated DNA sequencer, the products must be purified to remove unincorporated fluorescent dyes, buffer, and unused deoxyribonucleotide triphosphates. This can be achieved using a variety of commercially available kits that utilize gel filtration or a solid phase reversible immobilization magnetic bead-based system to purify the products. Conversely, the reaction products can be purified by precipitation with ethanol and 3M sodium acetate, pH 4.6 (see http://pubmlst.org/neisseria/ and click on "information" then "sequencing protocol (microtiter plates)". Typically, the reaction products will be purified and dried down in a 96-well plate and reconstituted with formamide, EDTA, or water before electrophoresis. It is recommended that each laboratory follow the manufacturer’s protocol for the automatic sequencer system being employed.
See the Analysis of Sequence Data and Allele Determination section below for further information about data analysis.
- Overview
- fHbp typing
- Overview
Factor H binding protein (fHbp), also referred to as Genome-derived Neisserial Antigen 1870 (GNA1870) or lipoprotein 2086 (LP2086 protein), is a ~28 KD surface exposed protein that binds to human factor H, a negative regulator of the alternative pathway of complement activation. fHbp is widely distributed in N. meningitidis. Recruitment of factor H to the surface of N. meningitidis facilitates bacterial escape from the host innate immune system and promotes bacterial survival in the host (23). fHbp also induces bactericidal activity against N. meningitidis strains expressing this protein; thus it is a viable vaccine candidate protein and component vaccines including fHbp are currently under evaluation (9, 22). Analysis of the amino acid sequences from the mature form of fHbp, which does not include the leader peptide, reveals two distinct groups, subfamily A and B (22). However, DNA sequence analysis demonstrates three variant groups: group 1 (corresponding to subfamily B) and group 2 and 3 (together corresponding to subfamily A) (18). The data collected to date indicate some correlation of fHbp alleles with MLST or serogroups (18). Continuing determination of fHbp sequence diversity provides valuable information for the evaluation of potential vaccine efficacy and coverage as well as characterizing circulating populations of N. meningitidis.
- Primers used for PCR amplification
The primers used for PCR amplification of the fHbp gene of N. meningitidis are shown in Table 30.
- PCR reaction setup and cycling conditions
Reactions are performed in 50 µl volumes either in 8-well tube strips or in 96-well plates (Table 31). If doing many reactions, it is useful to prepare a master mix of reagents equal to the number of reactions plus one for each locus with all components except for the DNA.
Once the PCR reactions are set-up, immediately place them in the PCR machine and run. The cycling conditions for fHbp are shown in Table 32. Note that the annealing temperature of the reactions may need to be optimized when adapting the protocols for use in your laboratory.
Table 30. PCR primers for fHbp amplification
Gene Forward primer 5'-3' Reverse primer 5'-3' 1GenBank Accession # 2Amplicon size (nts) fHbp CDC3UNI
GTCCGAACGGTAAATTATYGTGCDC5UNI
CTATTCTGVGTATGACTAGFM999788 895
Footnotes
1The GenBank Accession number given may not be that of the strain actually used to design the PCR primers, but it is a strain that contains the primer sequences.
2These are the predicted amplicon sizes for the strain with the given GenBank Accession number. Because of the variable nature of these genes, the amplicon in other strains may differ from the size listed.
3IUCAC designations: Y = C or T; V = C, G, or T.Table 31. fHbp PCR amplification reaction set-up
Reagent Volume (µl) Comments PCR grade water 31.5 10X buffer 5.0 10 mM dNTPs 1.0 200 µM final concentration 10 µM CDC3UNI 4.0 0.8 µM final concentration 10 µM CDC5UNI 6.0 1.2 µM final concentration DNA polymerase 0.5 Template DNA 2.0 Final volume 50.0
Footnotes
* Some laboratories scale back the reaction volumes to 25 µl. Adjust each component of the reaction accordingly if 25 µl volumes are desired.
Table 32. Cycling conditions for fHbp amplification
1x (94°C, 5 min) 30x (95°C, 15 sec); (50°C, 15 sec); (72°C, 1.5 min) 1x (72°C, 5 min) 4°C, ∞ - Analysis of PCR products on an agarose gel
It is useful to check for a successful PCR amplification before moving onto reaction clean-up and sequencing. The protocol analyzing the amplified PCR products can be found in Appendix 2 at the end of this chapter.
- Nucleotide sequencing of fHbp PCR products
To perform DNA nucleotide sequencing, the DNA amplicons must be purified by the method of choice before sequencing reactions can be performed. These include gel filtration columns, a solid phase reversible immobilization magnetic bead-based system, or PEG8000/2.5M NaCl precipitation. Commercial kits for gel filtration columns are available from several companies and a protocol for PEG precipitation can be found at http://pubmlst.org/neisseria/ under "information" then "PCR protocol".
The PCR primers and protocols included here are those used at CDC and are optimized for these laboratories. Other protocols work well and it is up to the discretion of each laboratory to discern the optimal reagents and assay conditions for their laboratory, including appropriate validation and quality control. For a commonly used protocol, see: http://pubmlst.org/neisseria/ under "information" then "sequencing protocol (microtiter plates)".
Sequencing reactions for all assays described here should be carried out on both strands. Sequencing each strand provides greater confidence in the base calls versus having base calls made using a single data point.
- Sequencing primers for fHbp typing
The primers used to sequence the fHbp amplicon are the same as those used for amplification, but should be used at a concentration of 3.2 µM.
- Sequencing PCR setup and cycling conditions
Reactions are performed in 20 µl volumes either in 8-well tube strips or in 96-well plates. However, some laboratories perform sequencing reactions in 10 µl volumes. Adjust each component of the reaction accordingly if 10 µl volumes are desired. If doing many reactions, it is useful to prepare a master mix of reagents equal to the number of reactions plus one for each locus with all components except for the DNA. The sequencing PCR setup and cycling conditions are shown below in Tables 33 and 34, respectively.
Table 33. fHbp sequencing PCR reaction set-up
Reagent Volume (µl) Comments PCR grade water 11.0 5X buffer 4.0 Terminator nucleotides and polymerase* 1.0 200 µM final concentration 3.2 µM primer 1.0 0.16 µM final concentration Purified amplicon DNA 3.0 Final volume 20.0
Footnotes
* Note: chemistries can vary, thus optimize the reactions for your particular system. Primer concentrations and PCR set up parameters may vary depending on the type of enzyme, chemistry, and protocols used in individual laboratories. Each laboratory should optimize the protocols.
Once the reactions are setup, follow the cycling conditions in Table 34.
Table 34. Cycling conditions for fHbp amplification
25x (95°C, 10 sec); (52°C, 5 sec); (60°C, 4 min) 1x (4°C, ∞) - Purification of the sequencing reaction products
Before the reaction products can be resolved on an automated DNA sequencer, the products must be purified to remove unincorporated fluorescent dyes, buffer, and unused deoxyribonucleotide triphosphates. This can be achieved using a variety of commercially available kits that utilize gel filtration or a solid phase reversible immobilization magnetic bead-based system to purify the products. Conversely, the reaction products can be purified by precipitation with ethanol and 3M sodium acetate, pH 4.6 (see http://pubmlst.org/neisseria/ and click on "information" and "sequencing protocol (microtiter plates)". Typically, the reaction products will be purified and dried down in a 96-well plate and reconstituted with formamide, EDTA, or water before electrophoresis. It is recommended that each laboratory follow the manufacturer’s protocol for the automatic sequencer system being employed.
See the Analysis of Sequence Data and Allele Determination section below for further information about data analysis.
- Overview
- Penicillin-binding proteins (PBPs)
Alterations in PBPs are the major mechanism of resistance to penicillins and cephalosporins in S. pneumoniae. These bacteria possess several high-molecular-weight PBPs, and most decreased susceptibility and resistance is associated with alterations in PBP1a, PBP2b, and PBP2x. Remarkably, the vast majority of naturally occurring isolates displaying penicillin MICs > 0.25 ug/ml are characterized by carrying mosaic alleles of these genes that contain segments of closely related non-pneumococcal species. Sequence differences in the genes encoding these PBPs have been exploited to subtype β-lactam-resistant S. pneumoniae isolates. These methods include restriction fragment length polymorphisms (RFLPs) analysis of PCR products amplified from pbp1a, pbp2b and pbp2x, or comparisons of sequences of the amplified products to determine amino acid changes in these genes (5, 21, 26)
- Primers used for PCR amplification
PCR reactions for pbp1a, pbp2b and pbp2x are carried out in 3 separate reactions using the primers listed in Table 35.
Table 35. Primers for amplification and sequencing of pbp1a, pbp2b and pbp2x
Primer Sequence (5'-3') Gene Product size Reference pn1af GGC ATT CGA TTT GAT TCG CTT CTA TCA T pbp1a AF439258AF439258 (8) pn1ar CTG AGA AGA TGT CTT CTC AGG CTT TTG 1a-S1 AAG CTC AAA AAC ATC TGT GGG pbp1a Sequencing (2) 1a-S2 TAC TCC ACT CTA CAA CTG GG 1a-S3 CCA ACA AAC ATT TCA TCT GGA GC pbp2bf GAT CCT CTA AAT GAT TCT CAG GTG GCT GT pbp2b 1.5kb (8) pbp2bR GTC AAT TAG CTT AGC AAT AGG TGT TGG AT 2b-S1 TTG CTG AAA AGT TAT TTC AAT TC pbp2b Sequencing (2) 2b-S2 ATT GTC TTC CAA GGT TCA GCT pbp2xf CGT GGG ACT ATT TAT GAC CGA AAT GGA G pbp2x AF439258AF439258 11891189 pbp2xr2 GGC GAA TTC CAG CAC TGA TGG AAA TAA 2x-S1 GGA ACA GAA CAA GTT TCC CAA C pbp2x Sequencing (2) 2x-S2 GAT GCC ACG ATT CGA GAT TGG G 2x-S3 TTT ACA GCT ATT GCT ATT GAT GG - CR reaction setup and cycling conditions
PCR reactions are set up as shown in Table 36.
Table 36. pbp1a, pbp2b and pbp2x PCR amplification reaction set-up for S. pneumoniae
Reagent Volume (µl) Comments PCR grade water 22.45 10X buffer 3.0 10 mM dNTPs 0.75 250 µM final concentration 10 µM forward primer 0.9 0.3 µM final concentration 10 µM reverse primer 0.9 0.3 µM final concentration Taq DNA polymerase 1.0 1 unit Taq polymerase Template DNA 1.0 Final volume 20.0 Once the PCR reactions are set-up, immediately place them in the PCR machine and run. The cycling conditions are shown in Table 37. Note that the annealing temperature of the reactions may need to be optimized when adapting the protocols for use in your laboratory.
Table 37. Cycling conditions for pbp1a, pbp2b and pbp2x PCR amplification
1x (93°C, 5 min) 30x (93°C, 1 min); (52°C, 1 min); (72°C, 2 min) 1x (72°C, 2 min) 4°C, ∞ - Analysis of PCR products on an agarose gel
To check for successful PCR amplification, run 5 ml of the end-products on a 1% agarose gel (see protocol in Appendix 2 at the end of this chapter). Store the remainder at -20°C or proceed to RFLP analyses and/or PCR cleanup and DNA sequencing.
- RFLP analyses
PBP-gene amplicons are subjected to HaeIII plus RsaI digestion by the addition of 3U of the respective enzymes to 5 µl of unpurified PCR product, followed by 1-4 hr of incubation at 37°C (8). Fragments are then separated on a 2% agarose gel (see Appendix 2 at the end of the chapter, but add 2 g of agarose to 100 ml sterile distilled H2O instead of 1 g) and should include a DNA ladder (1kb) on each gel to allow for comparison of fingerprints. After electrophoresis, the gel is visualized under UV and the image captured using a camera.
- DNA sequencing
Sequencing of PCR products can also be setup to determine specific DNA sequences and amino acid changes that may be present in pbp1a, pbp2b and pbp2xgenes. To perform DNA nucleotide sequencing, the DNA amplicons must be purified by the method of choice before sequencing reactions can be performed. These include gel filtration columns, a solid phase reversible immobilization magnetic bead-based system, or PEG8000/2.5M NaCl precipitation. Commercial kits for gel filtration columns are available from several companies and a protocol for PEG precipitation can be found at http://pubmlst.org/neisseria/ under "information" then "PCR protocol". Various chemistries and platforms are available for sequencing and many laboratories outsource their sequencing to commercial companies.
-
Sequencing primers for pbp1a, pbp2b and pbp2x
The primers used to sequence the pbp1a, pbp2b and pbp2x amplicons are the same as those used for amplification of the genes as well as the additional primers listed in Table 35, but should be used at a final concentration of 0.3 µM.
- Sequencing PCR setup and cycling conditions
Reactions are performed in 20 µl volumes either in 8-well tube strips or in 96-well plates. However, some laboratories perform sequencing reactions in 10 ml volumes. Adjust each component of the reaction accordingly if 10 µl volumes are desired. If doing many reactions, it is useful to prepare a master mix of reagents equal to the number of reactions plus one for each locus with all components except for the DNA. The sequencing PCR setup and cycling conditions are shown below in Tables 38 and 39, respectively.
Table 38. pbp1a, pbp2b and pbp2x sequencing PCR reaction set-up
Reagent Volume (µl) Comments PCR grade water 5X buffer 4.0 Terminator nucleotides and polymerase* 1.0 200 mM final concentration 3.2 mM primer 1.0 0.3 mM final concentration Purified amplicon DNA 3.0 Final volume 20.0
Footnote
*Note: chemistries can vary, thus optimize the reactions for your particular system. Primer concentrations and PCR set up parameters may vary depending on the type of enzyme, chemistry, and protocols used in individual laboratories. Each laboratory should optimize the protocols.
Once the reactions are setup, follow the cycling conditions in Table 39.
Table 39. Cycling conditions for sequencing PCR
25x (95°C, 10 sec); (52°C, 5 sec); (60°C, 4 min) 1x (4°C, ∞) - Interpretation
After PCR and RFLP analysis the patterns can be visually compared or compared by using an RFLP analyses program to determine clusters of related pbp patterns. For sequence analysis of the pbp genes, the nucleotide and derived amino acid sequence data for strains are compared to the corresponding sequence data for the β-lactam susceptible laboratory isolate R6 (sequence available at GenBank accession numbers: pbp1a M90527; pbp2b X16022; pbp2x X16367) using DNA sequence alignment software. Mutations at positions in or close to each of the three (SXXK, SXN, and KXG) conserved motifs for PBP2b, PBP2x and PBP1a can then be identified and compared.
- Primers used for PCR amplification
- Pneumococcal surface protein A (PspA)
PspA is a surface protein and virulence factor found on all isolates of S. pneumoniae and is highly immunogenic. The pspA gene is variable at the nucleotide level, and the amino acid similarity of the surface-exposed N-terminal region of PspA proteins can be as little as 40%. Based on nucleotide and amino acid identity, pspA genes and encoded PspA proteins are classified together into six clades, subdivided into three families: family 1 (clades 1 and 2), family 2 (clades 3, 4, and 5), and the rarely observed family 3 (clade 6) (11). The extent of cross-reactivity of PspA clades follows roughly the degree of amino acid sequence homology and is maximal within strains of the same PspA family. The family can be recognized serologically, but the clade must be identified by the sequence. Studies have demonstrated that PspA family and clade distribution are independent of serotype, age, and clinical origin of the isolates, but are highly associated with genotype as determined by PFGE and/or MLST (33).
A PCR assay has been developed using primers specific for families 1, 2, and 3. Most isolates are either in family 1 or 2, thus two PCR reactions using primers family1- and 2-specific should be performed on each isolate. If both of these are negative, a PCR reaction using the primers specific for the rarely seen family 3 should be performed. Clade determination requires obtaining the DNA sequence of the allele, thus another PCR amplification reaction is required using primers that will amplify all three families.
- Primers used for PCR amplification
Primers specific for family 1 are LSM12 and SKH63 and for family 2 are LSM12 and SKH52 (33). A test for PspA family 3 can also be run using primers SKH41 and SKH42 (10) (Table 40). Isolates that are negative in all PCR reactions are classified as nontypeable (10).
If the isolate is positive for one of the families, the clade in which the isolate belongs can be identified only through obtaining the DNA sequence of the allele. To do this, perform another PCR amplification using primers LSM12 and SKH2, which will amplify all 3 families. This amplicon will then need to be sequenced (see below).
Table 40. Primers for amplification of pspA families1
Primer Sequence (5'-3') Reference LSM12 CCGGATCCAGCGTCGCTATCTTAGGGGCTGGTT (33) SKH63 TTTCTGGCTCATYAACTGCTTTC SKH52 TGGGGGTGGAGTTTCTTCTTCATCT SKH2 CCACATACCGTTTTCTTGTTTCCAGCC SKH41 CGCACAGACTTAACAGATGAAC (10) SKH42 CTTGTCCATCAACTTCATCC
Footnote
1IUPAC designations: Y = C.
- PCR reaction setup and cycling conditions
PCR reactions are set up as shown in Table 41.
Table 41. pspA PCR amplification reaction set-up for S. pneumoniae
Reagent Volume (µl) Comments PCR grade water 21.45 10X buffer 3.0 10 mM dNTPs 0.75 250 µM final concentration 10 µM forward primer 0.9 0.3 µM final concentration 10 µM reverse primer 0.9 0.3 µM final concentration Taq DNA polymerase 2.0 2 units Taq polymerase Template DNA 1.0 Final volume 30.0 Once the PCR reactions are set-up, immediately place them in the PCR machine and run. The cycling conditions are shown in Table 42. Note that the annealing temperature of the reactions may need to be optimized when adapting the protocols for use in your laboratory.
Table 42. pspA PCR amplification reaction set-up for S. pneumoniae
Reagent Volume (µl) Comments PCR grade water 21.45 10X buffer 3.0 10 mM dNTPs 0.75 250 µM final concentration 10 µM forward primer 0.9 0.3 µM final concentration 10 µM reverse primer 0.9 0.3 µM final concentration Taq DNA polymerase 2.0 2 units Taq polymerase Template DNA 1.0 Final volume 30.0 - Analysis of PCR products on an agarose gel
To check for successful PCR amplification and to determine to which family the allele belongs, run 5 µl of the end-products on a 1% agarose gel (see protocol in Appendix 2 at the end of the chapter). The remainder should be stored at -20°C or PCR cleanup and DNA sequencing can be performed immediately after successful PCR amplification has been confirmed.
- Interpretation
The family 1-, 2- and 3-specific primers will produce PCR products that are approximately 1,000 bp for family 1, 1,200 bp for family 2 and 770 bp for family 3 and can be used to assign strains into pspA families.
- DNA Sequencing to determine clade
The amplicon derived from the PCR amplification using primers LSM12 and SKH2 can be sequenced to determine the clade in which the isolate belongs. To perform DNA nucleotide sequencing, the DNA amplicons must be purified either by gel filtration columns, a solid phase reversible immobilization magnetic bead-based system, or PEG8000/2.5M NaCl precipitation before sequencing reactions can be performed. Commercial kits for gel filtration columns are available from several companies and a protocol for PEG precipitation can be found at http://pubmlst.org/neisseria/ under "information" then "PCR protocol". Various chemistries and platforms are available for sequencing and many laboratories outsource their sequencing to commercial companies.
- Sequencing primers
Sequence using the LSM12 and SKH2 primers, but use them at a final concentration of 0.3 µM.
- Sequencing PCR setup and cycling conditions
Reactions are performed in 20 µl volumes either in 8-well tube strips or in 96-well plates. However, some laboratories perform sequencing reactions in 10 µl volumes. Adjust each component of the reaction accordingly if 10 µl volumes are desired. If doing many reactions, it is useful to prepare a master mix of reagents equal to the number of reactions plus one for each locus with all components except for the DNA. The sequencing PCR setup and cycling conditions are shown below in Tables 43 and 44, respectively.
Table 43. Clade sequencing PCR reaction set-up
Reagent Volume (µl) Comments PCR grade water 11.0 5X buffer 4.0 Terminator nucleotides and polymerase* 1.0 200 µM final concentration 100 nM primer 1.0 5 nM final concentration Purified amplicon DNA 3.0 Final volume 20.0
Footnote
*Note: chemistries can vary, thus optimize the reactions for your particular system. Primer concentrations and PCR set up parameters may vary depending on the type of enzyme, chemistry, and protocols used in individual laboratories. Each laboratory should optimize the protocols.
Once the reactions are setup, follow the cycling conditions in Table 44.
Table 44. Cycling conditions for sequencing PCR
25x (95°C, 10 sec); (52°C, 5 sec); (60°C, 4 min) 1x (4°C, ∞) - . Interpretation
The DNA sequences generated are used to determine the amino acid sequence searched against the sequence database by using BLAST software (www.ncbi.nlm.nih.gov/BLAST). To further classify the strains, the diversity based on pspA clades is determined by comparing the amino acid sequences found for strains tested with those amino acid sequences of the clade-defining region of 24 invasive reference sequences retrieved from GenBank [Accession numbers AF071802 to AF071809 (Clade 1), AF07810 to AF071814, M74122 (Clade 2), AF071816 to AF071818 (Clades 3), AF071821, AF071824, AF071826, U89711 (Clade 4), AF071820 (Clade 5), and AF071823 (Clade 6)] (33). PspA proteins in the same clade share similar sequences and any variation of sequences within clades is restricted to single-amino-acid substitutions. Clade type can also be established by determining clusters using the DNA sequences to generate a dendrogram with software using Pearson’s coefficient and the hierarchical unweighted pair group method (UPGMA). Proteins within the same clade are greater than 90% identical in sequence.
- Quality control
- Primers used for PCR amplification
- Analysis of sequence data and allele determination
After the sequence reaction products have been resolved and the data obtained from the sequencer, the trace files must be analyzed for incorrect base calls and the complementary strands must be aligned. For MLST, the alleles must be aligned and trimmed so that they correspond exactly to the regions that are used to define the alleles. For the OMPs, the sequence is translated so that the allele types or clade determination based on the amino acid sequence can be made. In addition the nucleotide changes in the domains typically responsible for penicillin resistance in the pbp1a, pbp2b and pbp2x genes in S. pneumoniae need to be determined. Various computer packages are suitable for assembling, aligning and editing the trace files from the automated DNA sequencer to create consensus sequence files suitable for these analyses.
-
MLST sequence analysis
Once consensus sequences are available, they can be uploaded to websites for allelic analysis and sequence type designations. For N. meningitidis MLST go to http://pubmlst.org/neisseria/ and look under "Access main databases", for H. influenzae MLST go to http://haemophilus.mlst.net/ and use "locus query" to obtain allele types and "profile query" to obtain a sequence type, and for S. pneumoniae MLST go to http://spneumoniae.mlst.net/ and use "locus query" to obtain allele types and "profile query" to obtain sequence types. Consensus sequences of each gene fragment are compared with those in the databases. The software checks that the sequences are the correct length and that they do not contain any undetermined characters. Options are available to identify the allele at a single locus, to enter an allele profile, to find isolates in the database that match or nearly match an allele profile, or to browse the database. Consensus sequences not represented in the database can be submitted as a new allele. The database curator evaluates the trace files of the sequence before assigning a number to the new allele and including it in the database. In addition, the databases have links to various programs for further data analyses.
Freeware programs that provide the capability of assembly, aligning, editing, producing a consensus sequence, and also provide MLST types and clonal complex types in one package are the Sequence Type Analysis and Retrieval System (STARS) and the Meningococcus Genome Informatics Platform (MGIP). In addition, both systems are expandable to include other species and loci. However, STARS is Linux-based, requires technical expertise to program for expansion and no longer has technical support. MGIP is a web-based interface requiring only a computer and an internet connection that allows the user to upload to the website sequence trace files and a worksheet template (http://mgip.biology.gatech.edu/home.php). Analyzed sequence data, including ST and CC designations, will be returned to the user within minutes of submission (12). Furthermore, MGIP will also perform OMP analysis and is expandable to include any loci the user wishes to add. At this writing, MGIP is only available for N. meningitidis loci, but is being expanded to include S. pneumoniae and H. influenzae.
-
Analyzing a set of sequence data using MGIP
MGIP does not require a user to register to use the website. However, if accessing the website functions as a public user any data uploaded is available for anyone to see and download. It is thus advisable to register, which only requires a username, password, first and last name, email address, and institution.
MGIP requires two files to be uploaded in order to analyze data: 1) A zip file or compressed archive of the sequencing trace files; and 2) A spreadsheet template file in the CSV (comma separated values) format that identifies the name of the reaction, the type of assay (MLST, porA, etc), and primer in each well of the sequencing plate. Note that multiple typing schemes can be analyzed on a single plate.
- Compressing (or zipping) the trace files
Uploading is done by the set, which is all of the trace file data from a 96-well plate. Do not rename the trace files. MGIP depends on the coordinates in each filename to map each trace file back to the spreadsheet. Thus, if you must rename the trace filenames, preserve the coordinates (e.g., instead of the filename 1433_B01.ab1, you can rename the file to 999_aroE_B01.ab1). In order to upload a data set:
- Put all of the sequencing files associated with the data set to be analyzed into a single folder.
- Zip the folder. In Windows, right click the folder, select "Send To" and then "Compressed "zipped" folder." (Figure 1). If the "send to" is not on the menu, then select "add to zip file" or "create archive." Any of these options will create a zip file.
There are ways to create zip files in most operating systems such as MacOS or Linux, which are very similar to the method described above. The resulting file must be a zip of the directory of trace files and can have any name.
- Creating the template spreadsheet
Each cell in the spreadsheet corresponds to the appropriate well from the sequencing plate. For example, a trace file from a well might be automatically named 1433_B01.ab1, which corresponds to the first column, second row of your wells. Hypothetically, if the well B01 contains the locus pgm_ from the strain M2341 and it was the forward primer, then the correct way to label the cell is M2341.MLST.pgm_.1. The correct way to label each cell in the spreadsheet isstrain.sequencingTypingMethod.locus.primer. Any blank well should either be blank or have the word BLANK in the cell. Exact locus names and sequence typing method names can be found on the MGIP upload page at http://mgip.biology.gatech.edu/uploadTraces.php.
To generate an entire spreadsheet (which you may have to modify), you can use the form found on the upload page under the Automatic Spreadsheet Generation section. After viewing the resulting table from the Automatic Spreadsheet Generator, you can click the download button to save the spreadsheet. The spreadsheet must be in CSV format, which is available as a "save as..." option in Excel and in other spreadsheet programs. Therefore you can convert any spreadsheet you have to a CSV format by opening it in a spreadsheet program and saving it as a CSV.
- Uploading the files
Upload the zipped sequence files and template spreadsheet at: http://mgip.biology.gatech.edu/uploadTraces.php. After uploading, click "Analyze Trace Files".
- Compressing (or zipping) the trace files
- Viewing results
- By set
Once the files are analyzed, the alignments and results can be viewed by clicking on the name of the set of sequences. Or starting from the main page, click "view results" and click on the name of the set of sequences.
From the first box, choose the data set. The sets are named after your original zip file (Figure 2).
An alignment's blast results, fasta format sequence, or the actual trace files that were uploaded can be viewed (Figure 3). Find the alignment's strain/locus and click the options link to view the aforementioned choices. An editing function is available to adjust incorrect base calls, if necessary. In addition, files that were unable to be fully analyzed and need the attention of the user are marked with a red flag.
- By strain
The user can view their strains in a table alongside their alleles. Click the "strain table" link from the main menu. Strains are listed on the left, alleles in the middle, and lastly, the derived Sequence Type is on the right. If enough information is present, then the database will indicate the ST of the isolate. If insufficient data is present to designate a ST, then a list of all possible STs is given (Figure 4). In the case of a combination of alleles that are not present in the database, a designation of "novel strain" will be displayed.
- By set
- OMP sequence analysis
See above for assembling, editing, and aligning sequences to produce a consensus sequence. Once the consensus sequences are created, they can be directly uploaded to the Neisseria.org website for typing:
- PorA
Neisseria meningitidis PorA variable region database: http://pubmlst.org/neisseria/PorA/, click on "Single sequence query" or "Batch sequence query" under the heading "Identify PorA variable regions to determine the VR1 and VR2 types. - PorB
Neisseria meningitidis PorB typing database: http://pubmlst.org/neisseria/porB/ click on "porB (NEIS2020) [whole coding region]" or "’porB [partial coding sequence]" under the heading "Identify porB alleles" to type the class and loop regions.
-
FetA Neisseria meningitidis FetA variable region database: http://pubmlst.org/neisseria/FetA/, click on "Single sequence query" or "Batch sequence query" under the heading "Identify FetA variable regions" to determine the FetA type.
-
fHbp Factor H-binding protein database: http://pubmlst.org/neisseria/fHbp/, click on "Single sequence query" or "Batch sequence query" under the heading "Identify fHbp alleles and peptides" to determine the fHpB type.
Consensus sequences not represented in the database can be submitted as a new allele. The database curator evaluates the traces of the sequence before assigning a number to the new allele and including it in the database. MGIP (see above MLST Analysis section) can also be used to obtain allele types for each of these OMPs.
- PorA
-
- Pulsed-field gel electrophoresis
- Overview
Pulsed-field gel electrophoresis (PFGE) is an agarose gel-based typing method that assesses strain inter-relatedness by comparison of complete genomes and has been applied to at least 40 pathogens (25). PFGE involves digesting genomic DNA with a restriction enzyme that cleaves chromosomal DNA infrequently to produce a small number (11-41) of fragments of different sizes. The resulting fragments are usually large and unable to be separated efficiently by conventional uni-directional electrical field gel electrophoresis. Two of the most commonly used methods to size-fractionate these large digestion products for PFGE are the contour-clamped homogenous electric field (CHEF) and field inversion gel electrophoresis (FIGE). CHEF uses a hexagonal array of 24 electrodes that produce an alternating 120° angle uniform electrical field. FIGE is based on a conventional electrophoresis in which the electric field is periodically inverted by 180° (25). In both CHEF and FIGE, the electric field used for PFGE is periodically alternated or pulsed to facilitate the migration of the DNA fragments through the gel. Larger fragments migrate through the gel slower than smaller fragments creating a size-based banding pattern that has larger fragments near the top of the gel and smaller fragments near the bottom of the gel (4, 14, 25). The resulting banding pattern can be analyzed by visual inspection or by using a computer program to determine differences in the banding patterns between isolates.
PFGE is a highly discriminatory subtyping tool and is particularly suitable for outbreak or cluster investigations. PFGE is used in combination with epidemiologic information to help identify outbreak isolates and to determine the relationships among isolates associated with the outbreak or cluster. The etiological agents in outbreaks are often clonal and produce indistinguishable PFGE patterns, but point mutations and insertions or deletions can occur during an outbreak that lead to a PFGE pattern difference of two or three fragments in isolates linked to the outbreak. Guidelines have been developed to interpret the minor variations in PFGE patterns from closely related strains, but these guidelines do not take into account the total genetic variation observed within the circulating population (27). Isolates that differ by two or three fragments are still considered epidemiologically linked subtypes of the same strain.
- Preparation for PFGE
Time required for procedure
PFGE requires approximately 28-30 hours once overnight cultures are available, thus time management is important in planning the procedure.
Equipment
- Electrophoresis equipment
- CHEF system with pump and cooling unit module
- Documentation system equipped with a camera that can provide computer compatible images
- 37°C incubator
- 37°C water bath
- 56°C water bath
- 50°C water bath
- Orbital/shaker water bath
- Turbidity meter, spectrophotometer, or McFarland standards
- Scales/balances to measure solid reagents
- Microwave to melt agarose
Select reagents
- Appropriate agar plates for growing up cultures (see below)
- Rapid resolution agarose (rapid resolution of DNA and PCR products between 1 kb and 50 kb by electrophoresis) for making plugs
- A serine protease/endopeptidase such as Proteinase K (liquid or powder)
- 10X 1 M Tris/borate/EDTA, pH 8.0 (TBE)
- 1 M Tris-HCl, pH 8.0
- 0.5 M EDTA, pH 8.0
- N-Lauroyl sarcosine sodium salt
- Ethidium bromide, 10 mg/ml
- Restriction enzyme and enzyme-specific buffer
- Sterile distilled deionized H2O (dd H2O)
Supplies
- PFGE plug molds (reusable or disposable)
- Gel comb and holder
- Casting frame, platform, and leveling table
- Sterile clear polystyrene 12 X 75 mm tubes with caps
- Sterile 1.5 ml microcentrifuge tubes
- Sterile 2 ml round bottom tubes
- Scalpels or single edge razor blade
- Glass slides
- Sterile disposable Petri dishes or large glass slides
- Flat spatula
- Container to stain gel
- Sterile screw cap flasks or bottles
- Sterile graduated cylinders
- Sterile 50 ml screw cap centrifuge tubes
- Sterile pipettes
- PPE (gloves, eye, and respiratory protection)
- Heat-resistant gloves
- Reagent and solutions
Tris-HCl, 1.0 M, pH 8.0 (1 L)
- Dissolve 121 g Tris base in 800 ml ddH2O.
- Adjust to pH 8.0 with concentrated HCl.
- Mix and add sterile distilled H2O to 1 L.
- Autoclave or filter sterilize.
EDTA, 0.5 M, pH 8.0 (1 L)
- Dissolve 186 g EDTA in 700 ml ddH2O.
- Adjust pH to 8.0 with 10 M NaOH (~50 ml).
- Add sterile distilled H2O to 1 L.
- Autoclave or filter sterilize.
10% Sodium lauroyl sarcosine (Sarcosine)
- Add 10 g of N-Lauroyl sarcosine salt to 100 ml ddH2O.*
- Filter through a .22 micron membrane.
Footnote
*Eye and respiratory protection should be worn when weighing powdered Sarcosine.
Proteinase K (20 mg/ml)
- Add 100 mg of Proteinase K powder to 5 ml ddH2O.
- Filter sterilize, aliquot, and store at -20°C.
- Alternatively, 5 ml of a 20 mg/ml solution is available commercially.
Ethidium bromide (EtBr), 10 mg/ml
- Dissolve 0.2 g ethidium bromide in 20 ml ddH2O.
- Mix well and store at 4°C in the dark in 1 ml aliquots.
- EtBr is a powerful mutagen and should be handled with care.
Cell suspension buffer (100 mM Tris and 100 mM EDTA, pH 8.0)
- 10 ml of 1 M Tris, pH 8.0 (sterile solution, available commercially).
- 20 ml of 0.5 M EDTA, pH 8.0 (sterile solution, available commercially).
- Dilute to 100 ml with ddH2O, not tap water.
- Can be stored at room temperature (20-25°C) for several months.
Plug wash TE buffer (10 mM Tris; 1 mM EDTA, pH 8.0)
- 10 ml of 1 M Tris, pH 8.0.
- 2 ml of 0.5M EDTA, pH 8.0.
- Dilute to 1000 ml with ddH2O, not tap water.
- Can be stored at room temperature (20-25°C) for several months.
TBE (Tris/borate/EDTA) electrophoresis buffer, 10X stock solution*
- To 800 ml of ddH2O add:
108 g Tris base (890 mM).
55 g boric acid (890 mM).
40 ml 0.5 M EDTA, pH 8.0 (20mM). - 40 ml 0.5 M EDTA, pH 8.0 (20mM).
- Add ddH2O to 1 L.
- Autoclave or filter sterilize.
Footnote
*To make 0.5X TBE working solution, add 100 ml 10X TBE to 1.9 L distilled H2O.
Agarose(1.0% rapid resolution agarose)
- Add 250 mg of rapid resolution agarose to 23.5 ml of 0.5X TBE in a 250 ml flask and microwave for 1 min, swirl, and then microwave in 15 sec increments with swirling until the agarose is fully melted and the solution is clear.
- Place in 56°C water bath to keep agarose from hardening.
- Agar can be stored at room temperature for several months and can be re-melted and used again.
Cell lysis buffer 50 mM Tris: 50 mM EDTA, pH 8.0 and 1% Sarcosine)
- Add 25 ml of 1 M Tris, pH 8.0.
- Add 50 ml of 0.5 M EDTA, pH 8.0.
- Add 50 ml of 10% sodium lauroyl sarcosine (Sarcosine), membrane-filtered.
- Dilute to 500 ml with ddH2O, not tap water.
- Performing PFGE
Growth of bacteria
A pure culture of each isolate is grown on trypticase soy agar plates supplemented with 5% sheep blood for N. meningitidis and S. pneumoniae, or chocolate agar plates supplemented with hemin and NAD for H. influenzae in a humidified incubator for 18-24 hours at 37°C with 5% CO2. If the isolate does not look pure or if the growth is not sufficient, subculture in a humidified incubator for 18-24 hours at 37°C with 5% CO2.Preparation of gel plugs
Fill water baths to the correct water level with deionized water. Turn on shaking bath at 54°C and non-shaking baths at 56°C and 37°C. Prepare or re-melt plug agarose (see above) and hold at 56°C in the water bath until used.
- Label and set up a 12 x 75 mm plastic capped tube containing 2 ml of cell suspension buffer (CSB) for each isolate and for a control strain and a size marker.
- Using a 1 µl disposable loop, gently harvest enough growth to make a suspension of cells reading 0.48-0.52 using a turbidity meter or spectrophotometer at O.D.280. If a turbidity meter or spectrophotometer is not available, this amount of growth is approximately a 0.5 McFarland standard.
- To make a uniform suspension, rub the growth onto the side-wall of the tube just above the level of the CSB until it washes into the liquid. Before making the turbidity reading, gently mix the tube by finger-tapping until the suspension appears homogeneous within the tube.
- The bacterial concentration needs to be adjusted precisely. Achieving uniform concentrations is critical for reproducibility, resolution of the bands of similar size, and for comparison between different strains.
- Add 400 µl of each cell suspension to a labeled 1.5 ml microcentrifuge tube. Then add 20 µl of Proteinase K (20 mg/ml) to the side-wall of each tube above the suspension to avoid premature lysis of the cells.
- Add 400 µl of melted plug agarose and mix gently by pipetting the mixture up and down several times. Add 400 µl of the mix to fill a well of a 10-well reusable or disposable plug mold. Repeat for each suspension, filling all of the designated wells. Let the plugs harden for 5 min at 4°C or 15 min at room temperature (25°C). Extra plugs can be made from the left-over cell suspensions, if desired.
- Avoid making bubbles and do not vortex. To prevent hardening of the agarose, keep the flask in a beaker of water at 56°C until all of the plugs are made.
- Add 5 ml of cell lysis buffer (CLB) and 133 µl Proteinase K (20 mg/ml) to labeled 50 ml centrifuge tubes.
- Open the plug molds and push a plug into each of the designated tubes of CLB and close the caps tightly.
- Incubate for 1.5 to 2 hours in a 54°C shaker water bath set at 75 strokes per min.
Washing the plugs
- Pre-warm 500 ml of sterile reagent grade water and a liter of plug wash TE buffer in a 50°C water bath.
- Pour off CLB and add 15 ml sterile distilled water to each plug.
- Incubate for 15 min in a 50°C shaker water bath set at 150 strokes per min.
- Replace water with 15 ml of plug wash TE buffer and incubate for 20 min in a 50°C shaker water bath set at 150 strokes per min. Decant buffer and repeat 4X.
- Store plugs in tubes with 2-5 ml of plug wash TE buffer at 4°C until ready for restriction digestion. Plugs are usable for up to 4 months but it is preferable to use them as soon as possible after the washing step.
Restriction digestion
The restriction enzymes to use are dependent on the type of the bacteria being tested. For N. meningitidis use NheI, and for H. influenzae and S. pneumoniae use SmaI. Note that for further resolution, isolates can be cut with an additional enzyme, but do not cut with two enzymes in the same reaction. This is useful if other molecular characterization such as MLST will not be performed. SpeI can also be used for N. meningitidis and XmaI for H. influenzae and S. pneumoniae.
- Sterilize a single-edge razor blade and a clean 3 x 2 inch glass slide with 70% alcohol.
- Add 180 µl of sterile reagent grade water and 20 µl of the 10X restriction bufferfor the enzyme to be used to a 1.5 ml microtube for each isolate.
- Using a narrow spatula, remove a plug from the Plug Wash TE buffer and place it on the glass slide.
- Using the razor blade cut off and discard any uneven edges that may prevent the plug from fitting in the gel well.
- Cut two 1-2 mm thick slices from the plugs, including the standard plug and place them into one of the 1.5 ml microcentrifuge tubes and incubate at 37°C for 15 minutes (30°C for SmaI).
- The unused portions of the plugs can be returned to their storage tubes and refrigerated.
- The overall goal is to cut plug slices that are sufficient in size to easily manipulate, fit in the well, and that contain enough DNA to create a clear, easily readable banding pattern. The size of the band may need to be optimized for the bacteria being tested.
- Carefully aspirate the liquid from the tubes with a pipette, taking care not to damage or remove the plug slice.
- Replace the liquid with 170 µl of sterile distilled water, 20 µl of 10X restriction buffer, and 50 units of the appropriate enzyme.
- This can be prepared as a "master-mix" or each reagent can be added separately with gentle mixing.
- Incubate plug slices in a 37°C (30°C for SmaI) water bath for 1.5-3 hours.
- Note that SmaI loses 50% activity after one hour at 37°C.
- Carefully aspirate the liquid from the tubes and add 150 µl of 0.5X TBE buffer.
Gel preparation and loading
- Make agarose (1.0% rapid resolution agarose) and place in a 56°C water bath until use.
- Remove 2 ml to a sterile tube and hold at 56°C to use later in the procedure.
- Assemble the gel-casting mold and make sure it is level on the leveling stand. Adjust the height of the comb teeth so that, when upright, the teeth touch the gel platform.
- Once the comb is in place, add molten agarose to the apparatus until the agarose is nearly to the top of the teeth of the comb. Take care that the agarose is well-mixed to ensure a uniform gel.
- Once the gel has hardened, carefully remove the comb.
- Lay the comb flat and using a narrow spatula remove the plug slices from each tube and place each one at the bottom of its designated comb tooth and allow plug slices to air-dry at ambient temperature for 15 minutes.
- Run one plug slice per isolate and save extra plug slices.
- Position the comb in the upper pair of slots of the gel casting stand and slowly pour the molten agarose from the flask into the mold and let the gel solidify for 25-30 min.
- Remove the comb and seal the wells with the 2 ml of molten agarose set aside.
- Transfer the gel on its platform into the chamber, be sure it is positioned properly in its frame and is immersed in the 0.5X TBE buffer. Typically 2 L of buffer is required for the gel to be submersed with 1 cm of buffer over the gel. Close the cover of the chamber and begin the run after setting the following parameters on the power supply:
Table 45. Electrophoresis parameters for PFGE
Initial switch time 2.2 seconds Final switch time 35 seconds Run time 18 hours Angle 120 degrees Gradient 6.0 volts/cm Temperature 14°C Ramping factor Linear Staining the gel and documenting the image
- Turn off the equipment at the end of the run.
- Set up a tray containing EtBr staining solution (400 ml of deionized water with 40 µl of [10 mg/ml] EtBr). Note that EtBr is a carcinogen and gloves and eye protection should be used.
- It is important that the gel box and cooling unit be cleaned after each run. To do this drain the buffer and pour 1 L of distilled H2O into the gel box and circulate for 2-3 min. Drain the distilled H2O and dry the apparatus.
- Remove the gel from the chamber and platform and immerse it in staining solution.
- Cover the tray to shield it from light and place it on a rotator or oscillating platform shaker and rotate slowly for 30 min.
- Pour off the EtBr staining solution according to safety regulations and destain the gel with 500 ml cold deionized water for 30 min on the rotator. Remove water and repeat 2X.
- Transfer the gel to an imaging system to photograph the image under UV light and save it on the computer as a tagged image file format (TIFF) file for further analysis. TIFF is the preferred format because of its greater resolution but the files can be saved as .jpeg if file size is a problem. If an imaging system is unavailable, a photo of the agarose gel can be taken.
Analysis of image and interpretation
Visual analysis can be used to directly compare the band patterns of a limited number of isolates on a gel. However, several computer software programs have been developed to analyze gel images, compare multiple gel images, match banding patterns, construct dendrograms, and store gel data to allow for more accurate and sophisticated data analyses. The banding patterns are analyzed with the Dice coefficient, an optimization of 1.0%, and a position tolerance of 1.5% for the band migration distance. A PFGE-based clonal group is defined as a group of isolates with genetically related PFGE patterns. In general, the PFGE patterns of strains categorized within a clonal group have six or fewer differences from each other and ≥80% genetic relatedness on the dendrogram. When comparing isolates associated with an outbreak, it is helpful to include isolates that do not have an epidemiological link to the outbreak to determine if the outbreak clone is currently circulating within the population or if it has been recently introduced. After results are obtained using the software, it is recommended that the results be visually compared to the bands on the gel to be sure the results make sense.
For S. pneumoniae, comparisons of PFGE profiles to those of major global clones should be made by using the profiles described by the Pneumococcal Molecular Epidemiology Network (PMEN) or reference isolates can be requested from this group to include in PFGE runs. (http://www.sph.emory.edu/PMEN/pmen_clone_collection.html).
- Technical considerations
Use of a standard
A standard or molecular weight size marker is used to provide an accurate fragment size estimate and assists with normalization and correction of gel patterns due to variations in electrophoresis. It should be included in each gel run to allow for inter- and intra-gel comparison of isolates. A common commercial marker is the lambda bacteriophage, which consists of concatamers of the bacteriophage lambda DNA. This marker is available in both high molecular weight and low molecular weight varieties and some laboratories use both on a gel. However, inconsistency in the DNA concentration and quality of the commercially available lambda ladders has been observed between vendors and in lot-to-lot variation of the ladder. Alternatively, a bacterial strain standard can be used that produces bands of known molecular weight. The bacterial standard does not necessarily have to be of the same strain being tested. The caveat with using a bacterial strain is that it must be prepared in the lab and mutations or genomic rearrangements can occur to change a cleavage site, thus changing the size of two or more of the bands. Regardless of the type of marker used, 3 lanes of the gel spaced evenly apart, but not on the edge of the gel, should be used for markers.
Care needs to be taken in the interpretation of results, especially in inter-laboratory studies, as small differences in electrophoresis conditions can alter the distance migrated by each band, complicating the comparison between isolates in different gels.
Quality control
Quality control (QC) is a measure of precision and a way to ensure that test results are correct, consistent and reproducible. Thus, QC for reagents used in a test is critical to the overall result and interpretation of the test. QC measures are listed below:
- Use clean glassware that is free of detergents to prepare reagents.
- Use sterile distilled water, not tap water, to prepare reagents.
- Perform regular maintenance on equipment; keep equipment clean; pipettors calibrated; and keep a maintenance/calibration log.
- New plugs to be used as standards should be run as an unknown to verify that the new standard produces the same banding pattern and intensity as the old standard.
- Test new lots of restriction enzyme to verify that the new enzyme is working properly and produces a consistent pattern.
- Sterilize the following reagents by filtration or by autoclaving before use: 10% Sarcosine, 1 M Tris-HCl, pH 8.0; 0.5 M EDTA, pH 8.0; and 10X Tris/Borate/EDTA buffer (TBE).
Troubleshooting
Unexpected results can be attributed to equipment failure, incorrect calculations, and improperly made reagents. When errors arise in an assay, it is helpful to review the equipment, reagents, and steps used in the procedure to look for errors. Listed below are some common problems encountered when performing PFGE with suggestions on how to correct them.
- No power to equipment:
- Check that equipment is plugged in and that the fuse in the back of the power supply is functional.
- Gel lanes are curved or slanted:
- Examine and replace any damaged electrodes.
- Check chamber for foreign objects and remove them if present.
- Be sure agarose plugs are firm enough for loading as fragmented plugs will not run correctly.
- Verify that the electrophoresis chamber is level. The gel must be poured level.
- Verify that the gel is securely loaded into the gel chamber.
- Bands have poor resolution:
- Fresh buffer should always be used and the buffer tank and circulation lines should be cleaned and flushed after each use.
- The level of the buffer used to run the gel could be incorrect or have changed during the run creating an electrical field that is not appropriate; therefore check buffer levels carefully and add or drain buffer as needed.
- High buffer concentration elevates the temperature of the run buffer. If this is suspected, remake the running buffer
- Check chiller to make sure it is working properly to cool the run buffer.
- Remove any kinks in the tubing. This may reduce the flow rate of the pump which would increase the temperature of the buffer.
- The percentage of agarose used may have been too low.
- Faint bands or no bands on gel:
- Low amounts of DNA or degraded/sheared DNA in the plugs will not produce good results. If this problem is suspected, remake the plugs.
- The bacteria in the plug may not have been completely lysed. Verify that a sufficient amount of Proteinase K was used and that the cell lysis buffer was made properly and used at the correct temperature.
- Verify that the gel was stained with EtBr made at the correct concentration.
- The gel has unspecific signal in areas where no signal is expected (background):
- Plugs may not have been washed thoroughly. Rewash the plug and repeat restriction digest.
- The DNA concentration in the plug was too high. Use a thinner plug slice or remake the plug with the proper cell concentration.
- Faint bands that appear on the gel between normal bands:
- The agarose plug may not have been properly digested with restriction endonuclease. Digest the plug again making sure that the correct concentration of enzyme is used for the proper length of time, that the proper enzyme buffer was used, and that the plug slice is completely submerged during digestion.
- Specks appear in stained gel.
- Verify that the gel does not contain undissolved agarose. If so, remake the gel with agarose completely dissolved and thoroughly mixed.
- Clean the surface of imager and lens to remove particles, if present.
- Wear non-powdered gloves during the procedure as powdered gloves leave powder that gets on the gel and fluoresces when exposed to UV light.
- The EtBr may be incompletely dissolved.
- Overview
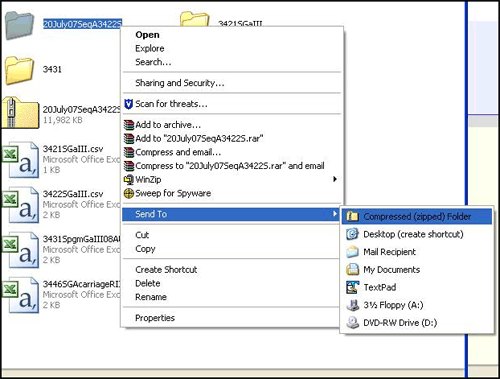


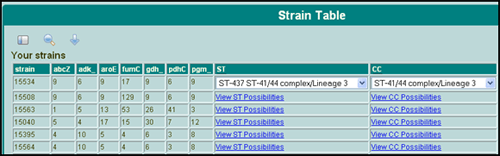
Appendix 1
Fast DNA extraction protocol for N. meningitidis and H. influenzae (gram-negative)
- Dispense 1.0 ml of 10 mM Tris (pH 8.0) buffer into vials and label.
- Harvest colonies from 18-24 hour pure cultures of H. influenzae and/or N. meningitidis using a sterile polyester or rayon-tipped swab and swirl the swab in the Tris buffer to make a turbid suspension (equivalent to McFarland 3.0 standard). Be careful not to pick up pieces of agar on swab.
- Vortex briefly and boil cell suspension at 100°C for 10 minutes.
- Proceed immediately with PCR or store at -20°C.
The procedure above is not vigorous enough to completely lyse the more robust cell wall of S. pneumoniae, a gram positive organism. Use the protocol below to prepare DNA from isolates of S. pneumoniae. Also use the protocol below if the identity of the bacterial isolate is unknown.
Fast DNA extraction protocol for S. pneumoniae (gram-positive)
- Dispense 300 µl of 0.85% NaCl into vials and label.
- Harvest colonies from 18-24 hour pure cultures of S. pneumoniae using a sterile polyester or rayon-tipped swab and swirl the swab in the 0.85% NaCl to make a turbid suspension (equivalent to McFarland 3.0 standard). Be careful not to pick up pieces of agar on the swab.
- Vortex briefly and incubate at 70ºC for 15 minutes.
- Microcentrifuge at 12,000 x g for 2 minutes and remove the supernatant.
- Re-suspend in 50 ml TE buffer (10 mM Tris-HCl, 100 mM EDTA, pH 8.0) and add 10 ml mutanolysin (3000 U/ ml)* and 8 ml of hyaluronidase (30 mg/ml)**
- Incubate at 37oC for 30 minutes up to 18 hours (overnight).
- Heat-inactivate the enzymes in the suspension by boiling at 100ºC for 10 minutes.
- Microcentrifuge at 12,000 x g for 4 minutes and remove supernatant for use as DNA template.
- Proceed immediately with PCR or store at -20°C.
Footnote
*Mutanolysin (10,000 U). Dilute in 3.3 ml of TE buffer to make 3000 U/ml stock solution, store at -20°C as 500 µl aliquots.
**Hyaluronidase (100 mg). Dilute in 3.3 ml of TE buffer to make 30 mg/ml solution, store at -20ºC as 500 µl aliquots.
Methods for DNA extraction that will provide purified DNA can be found in Chapter 10: PCR Methods.
Appendix 2
Analysis of PCR products on an agarose gel
To check for a successful PCR amplification, run an aliquot of the end-products on a 1% agarose gel.
- Briefly spin the PCR plate or tubes at 500 x g to ensure all liquid is at the bottom of the wells.
- Mix 5 ml of PCR reaction with 1 ml of 6X loading dye (see Table 46 for protocol). It is important to include DNA size markers in one of the wells.
- Make a 1% agarose gel. Add 1 g of electrophoresis grade agarose to 100 ml of 1X Tris/Borate/EDTA (TBE) buffer (see below) in a 250 ml flask and melt the agarose in a microwave. Microwave for 1 min, swirl, and then microwave in 15 sec increments with swirling until the agarose is fully melted and the solution is clear. Be cautious as the molten agarose will be extremely hot. Once the agar has cooled to approximately 55°C add 1-2 µl of EtBr (see below) and swirl. Pour into a gel casting box, insert the comb, and allow time for hardening. Remove the comb after the gel has hardened.
- EtBr is a powerful carcinogen and must be handled with care.
- Add 1X TBE buffer to the gel box until the buffer is just over the surface of the gel and pipette the DNA/loading dye mixtures into the wells.
- Electrophorese the gel at 50-100 volts for 15-20 minutes or until the Bromophenol Blue dye band is halfway down the gel. The dye runs at approximately the same rate as a 500 base-pair DNA fragment.
- Visualize the gel under a UV light and print out or save the image, if possible.
- Each reaction should give a single band. If multiple bands are consistently present, annealing temperature optimization may be required.
- Store the remainder of the amplicon at -20°C unless proceeding directly to DNA purification.
Table 46. Protocol for making 6X loading dye
| Reagent | Needed for 10mls | Notes |
|---|---|---|
| 2.5% Ficoll 400 | 0.25 ml | |
| 11 mM EDTA, pH 8.0 | 1.1 ml 0.1 M EDTA | See recipe below |
| 3.3 mM Tris-HCl, pH 8.0 | 0.3 ml 0.1 M Tris-HCl | See recipe below |
| 0.017% SDS | 0.17 ml 1% SDS | 1 g SDS* to 100 ml sterile distilled H2O for 1% SDS solution |
| 0.015% Bromophenol Blue | 0.15 ml 1% Bromophenol Blue | 0.1 g Bromophenol Blue in 10 ml sterile distilled H2O for 1% solution |
| sterile distilled H2O | 8.03 ml sterile distilled H2O | Make 0.5-1.0 ml aliquots of the batch of 6X loading dye |
Footnote
*Eye and respiratory protection should be worn when weighing out powdered SDS.
Stock solutions for reagents:
EDTA, 0.5 M, pH 8.0 (100 ml)
- Dissolve 18.6 g EDTA in 70 ml ddH2O.
- Adjust pH to 8.0 with 10 M NaOH (~5 ml).
- Add ddH2O to 100 ml.
- Autoclave or filter sterilize.
EDTA, 0.1 M, pH 8.0 (100ml)
- Dissolve 3.7 g EDTA in 70 ml ddH2O.
- Adjust pH to 8.0 with 10 M NaOH.
- Add ddH2O to 100 ml.
- Autoclave or filter sterilize.
Ethidium bromide (EtBr), 10 mg/ml
- Dissolve 0.2 g ethidium bromide in 20 ml ddH2O.
- Mix well and store at 4°C in the dark in 1 ml aliquots.
- EtBr is a powerful mutagen and should be handled with care.
Tris-HCl, 0.1 M, pH 8.0
- Dissolve 1.2 g Tris base in 80 ml ddH2O.
- Adjust to pH 8.0 with concentrated HCl.
- Mix and add sterile distilled H2O to 100 ml.
- Autoclave or filter sterilize.
TBE (Tris/borate/EDTA) electrophoresis buffer, 10X stock solution*
- To 900 ml of ddH2O add:
- 108 g Tris base (890 mM).
- 55 g boric acid (890 mM).
- 40 ml 0.5 M EDTA, pH 8.0 (20mM).
- Add ddH2O to a total volume of 1000 ml.
- Autoclave or filter sterilize.
*10X TBE will have to be diluted 1:10 to 1X in ddH2O before use.
References
- Brehony, C., K. A. Jolley, and M. C. J. Maiden. 2007. Multilocus sequence typing for global surveillance of meningococcal disease. FEMS Microbiology Reviews 31:15-26.
- Cafini, F., R. del Campo, L. Alou, D. Sevillano, M. I. Morosini, F. Baquero, and J. Prieto. 2006. Alterations of the penicillin-binding proteins and murM alleles of clinical Streptococcus pneumoniae isolates with high-level resistance to amoxicillin in Spain. The Journal of Antimicrobial Chemotherapy 57:224-229.
- Claus, H., J. Elias, C. Meinhardt, M. Frosch, and U. Vogel. 2007. Deletion of the meningococcal fetA gene used for antigen sequence typing of invasive and commensal isolates from Germany: Frequencies and mechanisms. Journal of Clinical Microbiology 45:2960-2964.
- Diggle, M. A., and S. C. Clarke. 2006. Molecular methods for the detection and characterization of Neisseria meningitidis. Expert Review of Molecular Diagnostics 6:79-87.
- Dowson, C. G., A. Hutchison, and B. G. Spratt. 1989. Extensive re-modelling of the transpeptidase domain of penicillin-binding protein 2B of a penicillin-resistant South African isolate of Streptococcus pneumoniae. Molecular Microbiology 3:95-102.
- Dyer, D. W., West, E.P., McKenna, W., Thompson, S.A., and Sparling, P.F. . 1998. A pleiotrophic iron-uptake mutant of Neisseria meningitidis lacks a 70-kilodalton iron-regulated protein. Infection and Immunity 56:977-983.
- Enright, M. C., and B. G. Spratt. 1999. Multilocus sequence typing. Trends in Microbiology 7:482-487.
- Gherardi, G., C. G. Whitney, R. R. Facklam, and B. Beall. 2000. Major related sets of antibiotic-resistant Pneumococci in the United States as determined by pulsed-field gel electrophoresis and pbp1a-pbp2b-pbp2x-dhf restriction profiles. Journal of Infectious Diseases 181:216-229.
- Giuliani, M. M., J. Adu-Bobie, M. Comanducci, B. Arico, S. Savino, L. Santini, B. Brunelli, S. Bambini, A. Biolchi, B. Capecchi, E. Cartocci, L. Ciucchi, F. Di Marcello, F. Ferlicca, B. Galli, E. Luzzi, V. Masignani, D. Serruto, D. Veggi, M. Contorni, M. Morandi, A. Bartalesi, V. Cinotti, D. Mannucci, F. Titta, E. Ovidi, J. A. Welsch, D. Granoff, R. Rappuoli, and M. Pizza. 2006. A universal vaccine for serogroup B meningococcus. Proceedings of the National Academy of Sciences of the United States of America 103:10834-10839.
- Hollingshead, S. K., L. Baril, S. Ferro, J. King, P. Coan, and D. E. Briles. 2006. Pneumococcal surface protein A (PspA) family distribution among clinical isolates from adults over 50 years of age collected in seven countries. Journal of Medical Microbiology 55:215-221.
- Hollingshead, S. K., R. Becker, and D. E. Briles. 2000. Diversity of PspA: mosaic genes and evidence for past recombination in Streptococcus pneumoniae. Infection and Immunity 68:5889-5900.
- Katz, L. S., C. R. Bolen, B. H. Harcourt, S. Schmink, X. Wang, A. Kislyuk, R. T. Taylor, L. W. Mayer, and I. K. Jordan. 2009. Meningococcus genome informatics platform: a system for analyzing multilocus sequence typing data. Nucleic Acids Research 37:W606-11.
- Liao, J.-C., C.-C. Li, and C.-S. Chiou. 2006. Use of a multilocus variable-number tandem repeat analysis method for molecular subtyping and phylogenetic analysis of Neisseria meningitidis isolates. BioMed Central Microbiology 6:44.
- Lukinmaa, S., U.-M. Nakari, M. Eklund, and A. Siitonen. 2004. Application of molecular genetic methods in diagnostics and epidemiology of food-borne bacterial pathogens. Acta Pathologica, Microbiologica et Immunologica Scandinavica (APMIS) 112:908-929.
- Maiden, M. C., J. A. Bygraves, E. Feil, G. Morelli, J. E. Russell, R. Urwin, Q. Zhang, J. Zhou, K. Zurth, D. A. Caugant, I. M. Feavers, M. Achtman, and B. G. Spratt. 1998. Multilocus sequence typing: a portable approach to the identification of clones within populations of pathogenic microorganisms. Proceedings of the National Academy of Sciences of the United States of America 95:3140-3145.
- Maiden, M. C., J. Suker, A. J. McKenna, J. A. Bygraves, and I. M. Feavers. 1991. Comparison of the class 1 outer membrane proteins of eight serological reference strains of Neisseria meningitidis. Molecular Microbiology 5:727-736.
- Marsh, J. W., M. M. O'Leary, K. A. Shutt, and L. H. Harrison. 2007. Deletion of fetA Gene Sequences in Serogroup B and C Neisseria meningitidis Isolates. Journal of Clinical Microbiology 45:1333-1335.
- Masignani, V., M. Comanducci, M. M. Giuliani, S. Bambini, J. Adu-Bobie, B. Arico, B. Brunelli, A. Pieri, L. Santini, S. Savino, D. Serruto, D. Litt, S. Kroll, J. A. Welsch, D. M. Granoff, R. Rappuoli, and M. Pizza. 2003. Vaccination against Neisseria meningitidis Using Three Variants of the Lipoprotein GNA1870. Journal of Experimental Medicine 197:789-799.
- McGuinness, B. T., P. R. Lambden, and J. E. Heckels. 1993. Class 1 outer membrane protein of Neisseria meningitidis: epitope analysis of the antigenic diversity between strains, implications for subtype definition and molecular epidemiology. Molecular Microbiology 7:505-514.
- Meats, E., E. J. Feil, S. Stringer, A. J. Cody, R. Goldstein, J. S. Kroll, T. Popovic, and B. G. Spratt. 2003. Characterization of encapsulated and noncapsulated Haemophilus influenzae and determination of phylogenetic relationships by multilocus sequence typing. Journal of Clinical Microbiology 41:1623-1636.
- Muñoz, R., T. J. Coffey, M. Daniels, C. G. Dowson, G. Laible, J. Casal, R. Hakenbeck, M. Jacobs, J. M. Musser, and B. G. Spratt. 1991. Intercontinental spread of a multiresistant clone of serotype 23F Streptococcus pneumoniae. Journal of Infectious Diseases 164:302-306.
- Murphy, E., L. Andrew, K. L. Lee, D. A. Dilts, L. Nunez, P. S. Fink, K. Ambrose, R. Borrow, J. Findlow, M. K. Taha, A. E. Deghmane, P. Kriz, M. Musilek, J. Kalmusova, D. A. Caugant, T. Alvestad, L. W. Mayer, C. T. Sacchi, X. Wang, D. Martin, A. von Gottberg, M. du Plessis, K. P. Klugman, A. S. Anderson, K. U. Jansen, G. W. Zlotnick, and S. K. Hoiseth. 2009. Sequence diversity of the factor H binding protein vaccine candidate in epidemiologically relevant strains of serogroup B Neisseria meningitidis. Journal of Infectious Diseases 200:379-389.
- Schneider, M. C., R. M. Exley, H. Chan, I. Feavers, Y.-H. Kang, R. B. Sim, and C. M. Tang. 2006. Functional significance of factor H binding to Neisseria meningitidis. Journal of Immunology 176:7566-7575.
- Schouls, L. M., A. van der Ende, M. Damen, and I. van de Pol. 2006. Multiple-Locus Variable-Number Tandem Repeat analysis of Neisseria meningitidis yields groupings similar to those obtained by Multilocus Sequence Typing. Journal of Clinical Microbiology 44:1509-1518.
- Singh, A., R. V. Goering, S. Simjee, S. L. Foley, and M. J. Zervos. 2006. Application of molecular techniques to the study of hospital infection. Clinical Microbiology Reviews 19:512-530.
- Smith, A. M., and K. P. Klugman. 1998. Alterations in PBP 1A essential-for high-level penicillin resistance in Streptococcus pneumoniae. Antimicrobial Agents and Chemotherapy 42:1329-1333.
- Tenover, F. C., R. D. Arbeit, R. V. Goering, P. A. Mickelsen, B. E. Murray, D. H. Persing, and B. Swaminathan. 1995. Interpreting chromosomal DNA restriction patterns produced by pulsed-field gel electrophoresis: criteria for bacterial strain typing. Journal of Clinical Microbiology 33:2233-2239.
- Thompson, E. A., I. M. Feavers, and M. C. Maiden. 2003. Antigenic diversity of meningococcal enterobactin receptor FetA, a vaccine component. Microbiology 149:1849-1858.
- Urwin, R. 2001. Nucleotide sequencing of antigen genes of Neisseria meningitidis, p. 157-167. In M. C. J. Maiden and A. J. Pollard (ed.), Methods in Molecular Medicine., vol. Meningococcal Disease: Methods and Protocols. Humana Press Inc., Totowa, New Jersey.
- Urwin, R., and M. C. Maiden. 2003. Multi-locus sequence typing: a tool for global epidemiology. Trends in Microbiology 11:479-487.
- Urwin, R., J. E. Russell, E. A. Thompson, E. C. Holmes, I. M. Feavers, and M. C. Maiden. 2004. Distribution of surface protein variants among hyperinvasive meningococci: implications for vaccine design. Infection and Immunity 72:5955-5962.
- van der Ende, A., C. T. Hopman, and J. Dankert. 1999. Deletion of porA by recombination between clusters of repetitive extragenic palindromic sequences in Neisseria meningitidis. Infection and Immunity 67:2928-2934.
- Vela Coral, M. C., N. Fonseca, E. Castañeda, J. L. Di Fabio, S. K. Hollingshead, and D. E. Briles. 2001. Pneumococcal surface protein A of invasive Streptococcus pneumoniae isolates from Colombian children. Emerging Infectious Diseases 7:832-836.
- Yazdankhah, S. P., B. A. Lindstedt, and D. A. Caugant. 2005. Use of variable-number tandem repeats to examine genetic diversity of Neisseria meningitidis. Journal of Clinical Microbiology 43:1699-1705.
- Page last reviewed: April 15, 2016
- Page last updated: March 15, 2012
- Content source: