

Chapter 7: Identification and Characterization of Neisseria meningitidis
 ShareCompartir
Printer friendly version [15 pages]
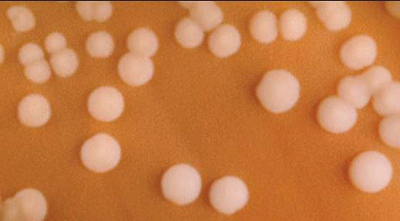
N. meningitidis are gram-negative, coffee-bean shaped diplococci that may occur intracellularly or extracellularly in PMN leukocytes. N. meningitidis is a fastidious organism, which grows best at 35-37°C with ~5% CO2 (or in a candle-jar). It can grow on both a blood agar plate (BAP) and a chocolate agar plate (CAP). Colonies of N. meningitidis are grey and unpigmented on a BAP and appear round, smooth, moist, glistening, and convex, with a clearly defined edge. N. meningitidis appear as large, colorless-to-grey, opaque colonies on a CAP. Prior to identification and characterization testing procedures, isolates should always be inspected for purity of growth and a single colony should be re-streaked, when necessary, to obtain a pure culture. For the following identification and characterization procedures, testing should be performed on 18-24 hour growth from a BAP (Figure 1) or a CAP (Figure 2) at 35-37°C with ~5% CO2 (or in a candle-jar).
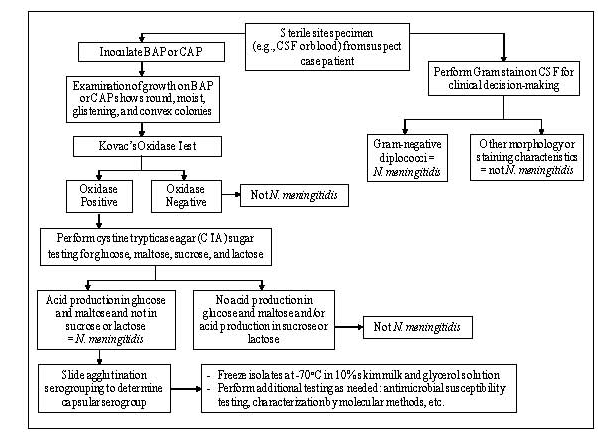
The following tests are recommended to confirm the identity of cultures that morphologically appear to be N. meningitidis (Figure 3). N. meningitidis can be identified using Kovac’s oxidase test and carbohydrate utilization. If the oxidase test is positive, carbohydrate utilization testing should be performed. If the carbohydrate utilization test indicates that the isolate may be N. meningitidis, serological tests to identify the serogroup should be performed. This sequence of testing is an efficient way to save costly antisera and time. Additional methods for identification and characterization of N. meningitidis using molecular tools are described in Chapter 10: PCR Methods and Chapter 12: Molecular Methods.
Biosafety Level 2 (BSL-2) practices are required for work involving isolates of N. meningitidis, as this organism presents a potential hazard to laboratory personnel and the surrounding working environment. Please refer to Chapter 4: Biosafety in order to follow the guidelines that have been established for laboratorians working in BSL-2 facilities as many of the tests described in this chapter require opening plates with live cultures and are often performed outside of a biosafety cabinet (BSC). molecular tools are described in Chapter 10: PCR Methods and Chapter 12: Molecular Methods.

-
Kovac's oxidase test
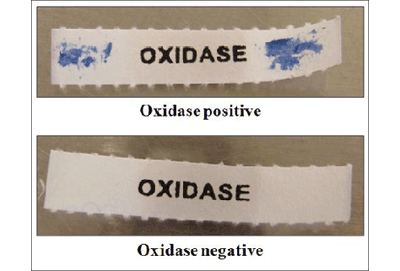
Kovac’s oxidase test determines the presence of cytochrome oxidase. Kovac’s oxidase reagent, tetramethyl-p-phenylenediamine dihydrochloride, is turned into a purple compound by organisms containing cytochrome c as part of their respiratory chain. This test aids in the recognition of N. meningitidis, but other members of the genus Neisseria, as well as unrelated bacterial species, may also give a positive reaction. Positive and negative quality control (QC) strains should be tested along with the unknown isolates to ensure that the oxidase reagent is working properly.
-
Preparation of 1% oxidase reagent from oxidase powder
To prevent deterioration of stock oxidase powder, the powder should be stored in a tightly sealed desiccator and kept in a cool, dark area. Kovac’s oxidase reagent is intended only for in vitro diagnostic use. Avoid contact with the eyes and skin as it can cause irritation. In case of accidental contact, immediately flush eyes or skin with water for at least 15 minutes.
- Prepare a 1.0% Kovac’s oxidase reagent by dissolving 0.1 g of tetramethyl-p-phenylenediamine dihydrochloride into 10 ml of sterile distilled water.
- Mix well and then let stand for 15 minutes.
- The solution should be made fresh daily and the unused portion should be discarded.
- Alternatively, the reagent could be dispensed into 1 ml aliquots and stored frozen at -20°C. The aliquots should be removed from the freezer and thawed before use. Discard the unused portion each day the reagent is thawed.
- Performing Kovac's oxidase test
Filter paper method
- Grow the isolate(s) to be tested for 18-24 hours on a BAP at 35-37°C with ~5% CO2 (or in a candle-jar).
- On a nonporous surface (i.e., Petri dish or glass plate), wet a strip of filter paper with a few drops of Kovac’s oxidase reagent.
- Let the filter paper strip air dry before use.
- Use a disposable plastic loop, a platinum inoculating loop, or a wooden applicator stick to pick a portion of a colony from overnight growth on the BAP and rub it onto the treated filter paper (Figure 4).
- Do not use a nichrome loop, as it may produce a false-positive reaction.
- Observe the filter paper for color change to purple.
- Perform steps 3 and 4 with a positive and negative QC strain to ensure that the oxidase reagent is working properly.
Plate method
- Grow the isolate(s) to be tested for 18-24 hours on a BAP at 35-37°C with ~5% CO2 (or in a candle-jar).
- Dispense a few drops of Kovac's oxidase reagent directly on top of a few suspicious colonies growing on the 18-24 hour BAP.
- Do not flood the entire plate as the bacteria exposed to the reagent are usually not viable for subculture.
- Tilt the plate and observe colonies for a color change to purple.
- Perform steps 1 and 2 with a positive and negative QC strain to ensure that the oxidase reagent is working properly.
- Reading the oxidase test results
- Positive reactions will develop within 10 seconds in the form of a purple color where the bacteria were applied to the treated filter paper. Delayed reactions are unlikely with N. meningitidis.
- Negative reactions will not produce a color change on the treated filter paper.
-
-
Carbohydrate utilization by N. meningitidis: cystine trypticase agar (CTA) method
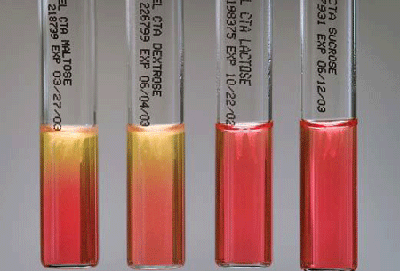
Carbohydrate utilization tests are used to validate the identification of a strain as N. meningitidis. For this procedure, 4 different carbohydrates (glucose [also called dextrose], maltose, lactose, and sucrose) are added to tubes containing a CTA base for a final concentration of 1%. A phenol red indicator is also included in the medium. It is a sensitive indicator that develops a yellow color in the presence of acid at a pH of 6.8 or less. A panel of four tubes, each containing a different carbohydrate, is used to test each isolate. Neisseria spp. produce acid from carbohydrates by oxidation, not fermentation. N. meningitidis oxidizes glucose and maltose, but not lactose or sucrose. While it is extremely rare, strains of N. meningitidis have been reported to either utilize glucose or maltose, but not both. Well-characterized QC strains should be tested along with the unknown isolates to ensure that the CTA sugars are working properly. N. meningitidis and/or N. lactamica isolates should be used to QC the CTA sugar media. Methods for preparation of the CTA sugar media are included in the Annex. CTA sugars should be stored at 4°C and warmed to room temperature (25°C) before use.
- Performing CTA sugar testing
- Grow the isolate(s) to be tested for 18-24 hours on a BAP at 35-37°C with ~5% CO2 (or in a candle-jar).
- Allow the 4 CTA sugars, glucose (also called dextrose), maltose, lactose, and sucrose, to warm to room temperature (25°C) and label the tubes with the lab ID.
- Remove 3-5 colonies from overnight growth on the BAP using a 1 µl disposable loop.
- Stab the CTA sugar several times into the upper 10 mm of medium. Approximately 8 stabs with the same loopful are sufficient.
- Use a separate disposable loop for inoculating each carbohydrate to be tested.
- Fasten the screw-cap of each tube loosely and place the tubes in a 35-37°C incubator without CO2. Incubate the CTA sugars for at least 72 hours (and up to 5 days) before discarding them as negative.
- Observe the CTA sugars for development of visible turbidity and color change to yellow.
- Perform steps 1-5 using a N. meningitidis, N. lactamica, and a N. sicca QC strain to ensure that the CTA sugars are working properly.
-
Reading the CTA sugar results
Development of visible turbidity and a yellow color in the upper portion of the medium indicates growth of bacteria and production of acid and is interpreted as a positive test (Figure 5). Although reactions may occur as early as 24 hours after inoculation, some reactions are delayed and negative results should not be interpreted before 72 hours of incubation. A color change to yellow without turbidity is usually not a positive reaction. Carbohydrate utilization results for differentiating N. meningitidis from other Neisseria spp. and bacteria are listed in Table 1.
Table 1. Carbohydrate utilization by some Neisseria and Moraxella spp.
Acid Production from:
Organism Glucose1 Maltose Lactose Sucrose Neisseria meningitidis + + - - Neisseria lactamica + + + - Neisseria gonorrhoeae +2 - - - Neisseria sicca + + - + Moraxella catarrhalis - - - - Footnotes
- 1Glucose may also be referred to as dextrose.
- 2Some strains of N. gonorrhoeae are weak acid producers and may appear to be glucosenegative in the CTA medium.
- Performing CTA sugar testing
-
Identification of N. meningitidis serogroup
Twelve serogroups, based on the biochemical composition of capsular polysaccharides, are currently recognized: A, B, C, H, I, K, L, W135, X, Y, Z, and 29E (Z'). Serogroup D is no longer recognized as a serogroup. Serogroups A, B, C, W135 and Y are the 5 most common causes of bacterial meningitis. Serogroup A has been the most common cause of epidemics in Africa and Asia. Serogroups C, W135, and X have also been reported as causes of epidemics in several parts of Africa as well. Serogroup-specific antisera for these major serogroups are available commercially.
It is not always practical to test for all serogroups for which antisera are available in a laboratory. Testing algorithms may be set up in laboratories with previous knowledge of the predominance or lack of serogroups within that particular geographic region in order to test for the most common serogroups first. Modifications may be made to the testing algorithm for any laboratory based on information about current strains that are circulating in the region. For example, in Africa, testing with antisera for serogroups A and W135 (and X in some regions) as well as with a saline control to detect nonspecific autoagglutination should be adequate to characterize most case isolates. Strains reacting negatively with A, W135, and X antisera should then be tested with other available antisera, particularly C, Y, and B. Nearly all case isolates are serogroupable, if they are tested against a comprehensive panel of antisera and proper controls are used. In rare instances, an isolate that does not react with any of the serogroup-specific antisera or reacts with more than one serogroup-specific antisera is considered nongroupable (NG). Polyvalent antisera containing combinations of serogroups (e.g., A, B, and C or X, Y, W135, and Z) may also be used.
It is essential that reference laboratories have the capacity to isolate, identify, and characterize the serogroup of isolates of N. meningitidis. This valuable data provides laboratories and public health authorities with the tools to identify outbreaks controllable by vaccination campaigns, recognize serogroups causing sporadic disease, and detect emergence of new outbreak strains.
-
Slide agglutination serogrouping (SASG) test for serogrouping N. meningitidis isolates
Formalin-killed meningococcal suspensions should be used for SASG testing rather than saline suspensions of living organisms to maintain a safe working environment. A solution of 5% formalinized physiological saline is sufficient to kill the bacteria. However, formalin is a carcinogen and must be stored and handled with great care. Alternatively, work should be performed under a biosafety hood if formalin is not used. Antisera should be stored in the refrigerator at 4°C and warmed to room temperature (25°C) before use. It must be put back in the refrigerator as soon as testing is finished to prevent the loss of binding activity of the antibody.
- Performing the SASG test
- Grow the isolate(s) to be tested for 18-24 hours on a BAP at 35-37°C with ~5% CO2 (or in a candle-jar).
- Clean a glass slide with alcohol (optional if slides are pre-cleaned).
- Divide the slide into equal sections (e.g., twelve 11 X 22 mm sections on a standard 50 X 75 mm slide) with a liquid impermeable pen or a wax pencil.
- Each isolate will require as many sections on the slide as the individual serogroup-specific antisera that will be tested as well as a saline negative control.
- In the lower portion of each of the sections of the glass slide described in step (2), add 10 µl of the 5% formalinized saline with a micropipettor.
- The instructions specify using a micropipettor with sterilized filtered tips to measure the 10 µl of the 5% formalinized saline to suspend the bacteria. The micropipettor will transfer precise and equal measurements for a proper SASG reaction.
- If a micropipettor and tips are not available, sterile, disposable 10 µl inoculation loops can be used to transfer 10 µl of the 5% formalinized saline, but often do not deliver accurate amounts (between 5-10 µl).
- Use a sterile, disposable 10 µl inoculating loop to collect a few colonies from the surface of the overnight culture incubated on the BAP.
- Suspend the bacteria in the 5% formalinized saline solution in the lower portion of each of the sections of the slide. The suspension should be moderately opaque (see saline control in Figure 6). Do not allow the cell suspension to dry before adding the antisera.
- If the bacteria are difficult to suspend directly on the slide, make a moderately milky suspension (comparable to McFarland 6 standard) of the test culture in a small vial with 250 µl of 5% formalinized saline and briefly vortex the suspension to mix and break up any pellets. Add 10 µl of this suspension to the lower portion of the slide.
- In the upper portion of each of the sections of the glass slide described in step (2), add 10 µl of the serogroup-specific antisera to be tested as well as unformalinized saline or phosphate buffered saline (PBS) for a negative control with a micropipettor.
- DO NOT use the dropper provided with the antisera because it usually delivers larger amounts than is necessary and can easily be contaminated.
- If a micropipettor and tips are not available, sterile, disposable 10 µl inoculation loops can be used to transfer 10 µl of the antisera, but often do not deliver accurate amounts (between 5-10 µl).
- Dispose of the tip or loop used to transfer the antisera to the slide in a waste container after each use to avoid contamination of the antisera. If the source of antisera is contaminated, a new vial must be used.
- Gently tilt the slide to mix the cell suspensions with the antisera in each section. Continue to gently rock the slide for 1 to 2 minutes to allow the lower and upper portions to completely blend. Do not use a circular motion while rocking, as it can cause the sections with different serogroup-specific antisera to run together and contaminate each other.
- After 2 minutes, examine the SASG reactions under a bright light and over a black background. Use the rating system in Figure 6 to determine the intensity of the agglutination reaction in each section of the slide. Disregard any agglutination that occurs after the 2 minute time period.
- Record the SASG results in the laboratory log book.
- Reading the SASG results
-
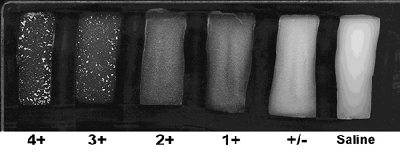
Rating the intensity of the agglutination reaction
Agglutination occurs when the antisera bind to the bacterial cells causing the cells to agglutinate or clump together, thus making the cell suspension appear clearer. The intensity of the agglutination reaction may vary according to the density of the cell suspension or the antisera used. A description on the intensity ratings shown in Figure 6 are listed below.
4+ All of the cells agglutinate and the cell suspension appears clear
3+ 75% of the cells agglutinate and the cell suspension remains slightly cloudy
2+ 50% of the cells agglutinate and the cell suspension remains slightly cloudy
1+ 25% of the cells agglutinate and the cell suspension remains slightly cloudy
+/- Less than 25% of the cells agglutinate and a fine granular matter occurs
0 No visible agglutination; the suspension remains cloudy and smooth - Determining the serogroup
- A positive result is designated by a 3+ or 4+ (strong agglutination) within 1-2 minutes, except for serogroup B, which is considered positive with a rating of 2+ or greater.
- A negative result is designated by a 0 (saline), +/-, 1+ or 2+ (weak agglutination).
- The serogroup is determined when a positive result occurs with only one of the antisera and not with the saline.
- If a serogroup is not determined, the isolate is considered NG. The following result combinations are all reported as NG:
- Agglutination in the saline, regardless of strong reactions with other antisera, characterizes the culture as autoagglutinating.
- Agglutination with more than one serogroup-specific antisera in the absence of agglutination in saline characterizes the culture as polyagglutinating or cross-reactive.
- No agglutination with any of the antisera or the saline characterizes the strain as non-reactive.
-
-
Troubleshooting procedures
N. meningitidis isolates are subject to variability (encapsulated vs. unencapsulated, small vs. large colonies, slow growers vs. fast growers, and heavy agglutinators vs. light agglutinators) and may be unclear or difficult to interpret. Some troubleshooting procedures are listed below:
- Repeat the test directly on the slide using growth from another section of the same plate.
- Make a cell suspension in a small tube and vortex if the result from SASG directly on the slide is unclear and repeat the test.
- Add 20 µl of antisera directly to slide and then add a loop full of organism without diluting the specimen with 5% formalinized saline.
- Subculture and retest fresh growth the following day.
- If the original plate contains different size colonies, make a subculture for each type of colony and test both cultures the next day. The larger colonies usually indicate better capsule production and therefore better reactivity. However, the smaller colonies will occasionally give a better result.
- If discrepancies are not immediately resolved, any subsequent SASG repeats should be used in conjunction with control strains.
-
Quality control (QC) of antisera for SASG testing
A set of reference strains for N. meningitidis serogroups A, B, C, W135, X, Y, Z, 29E (one per serogroup) and a nongroupable N. meningitidis strain should be used to QC the antisera before testing any unknown isolates. QC of the antisera should be:
- Performed for each new lot of antisera received in the laboratory.
- Performed biannually after initial QC testing.
- Repeated if a vial has been exposed to temperatures above 4°C or if there is reason to suspect that the vial has been contaminated since the initial QC was performed.
Follow the SASG testing procedure to QC each lot of antisera using all reference strains available in the laboratory. Record the results provided on the example QC sheet in Figure 7.
Reading the QC test results
Passing test:
- The antiserum must give 3+ or 4+ agglutination with homologous antigens within 1-2 minutes.
- The antiserum must not react with heterologous N. meningitidis serogroups, with the NG reference strain, or in saline.
Failing test:
- The antiserum agglutinates with one or more reference strains and/or with the NG reference strain and/or in saline.
A
(strain number)B
(strain number)C
(strain number)W135
(strain number)X
(strain number)Y
(strain number)Z
(strain number)29E (Z')
(strain number)NG
(strain number)A
Lot#++++ - - - - - - - - B
Lot#- ++++ - - - - - - - C
Lot#- - ++++ - - - - - - W135
Lot#- - - ++++ - - - - - X
Lot#- - - - ++++ - - - - Z
Lot#- - - - - ++++ - - - 29E
Lot#- - - - - - - ++++ - Saline - - - - - - - - - Figure 7. Example QC sheet for testing antisera against all N. meningitidis serogroups
-
-
Commercial identification kits
Several commercial identification systems that use biochemical or enzymatic substrates are available for identification of Neisseria spp. These systems may occasionally require supplemental tests, and additional characteristics, such as microscopic and colony morphology, must be considered. Generally, each system is self-contained, but the addition of one or more reagents to complete certain reactions may be necessary. The manufacturer's instructions should be followed precisely when using these kits. For detailed instructions and use of appropriate control strains, consult the Clinical Microbiology Procedures Handbook (2).
-
Serotyping and serosubtyping of N. meningitidis with monoclonal antibodies (Mabs)
Differentiation and classification of bacterial strains at the sub-species level require methods that are highly reproducible, little affected by the experimental conditions, and give effective discrimination of epidemiologically unrelated strains. Further characterization of bacteria causing meningitis is especially important to document the spread of particularly pathogenic clones. Many immunoassays have been developed for serological characterization of N. meningitidis antigens. Immunological detection of specific epitopes of two major outer-membrane proteins, PorB and PorA, is the basis for the serological classification system defining, respectively, the serotypes and serosubtypes of the species 1, 3-7). A simple, low cost method for serotyping and serosubtyping meningococci, dot-blotting with Mabs, is described below.
- Preparation of whole-cell suspensions
- Whole-cell suspensions should not be used for PCR testing.
- Grow the N. meningitidis isolate to be tested along with an appropriate reference isolate for QC on a BAP for 18-24 hours at 35-37°C with ~5% CO2 (or in a candle-jar).
- Collect 3-5 colonies using a sterile disposable loop or sterile swab and suspend in 1 ml of PBS (pH=7.2) with 0.02% sodium-azide.
- Inactivate the bacteria by heating the suspension at 60°C for 30 minutes.
- Adjust the optical density with PBS to 0.2 measured at 650 nm (equivalent to a McFarland 1.5).
- Maintain whole-cell suspensions at 4°C until use.
- Performing the dot-blotting serotyping/serosubtyping test
- Cut strips (0.5 x 10 cm) of nitrocellulose paper (pore 0.45 µm). Divide each strip into 10 sections of 1 cm in length using a wax pencil and align them on a glass or hard plastic plate.
- Use gloves and/or forceps when handling nitrocellulose paper.
- Label the strips with a permanent pen on the left section.
- Dot 2 µl of the whole-cell suspension of a relevant reference isolate in the middle of the next marked section and 2 µl of the test isolates successively onto each of the next sections, as shown in Figure 8.
- Dry the strips for 15 minutes or more.
- Add 2 ml of the blocking buffer (PBS supplemented with 3% bovine serum albumin [BSA]) into each well of an 8-well incubation tray (8-well trays with lids are commercially available).
- Transfer the strips to be tested with the same Mab to a well (maximum 4 strips per well). Mix gently for 30 minutes. The strips must be fully wetted by the blocking buffer.
- The minimum incubation volume of the blocking buffer for 1 strip is 0.5 ml. Up to 4 strips with about 40 dotted samples can be in incubated in a total volume of 2 ml. Consider leaving an empty well in the incubation trays between each set of strips that are incubated with different Mabs.
- Add the Mabs to the respective wells. Depending on the supplier of the Mab, the final dilution may range from 1:10 to 1:500,000.
- Place the lid on the incubation tray and incubate with gentle mixing overnight.
- Carefully remove the antibody solutions from the strips using a pipet tip connected to a suction pump or similar device. Rinse the tip with water between each set of strips that were incubated with different Mabs to prevent transfer of the Mabs.
- Rinse the strips 3 times with no more than 2 ml PBS directly in the wells. Remove the PBS in the same manner in which the antibody solutions were removed.
- Add 2 ml of PBS supplemented with 3% BSA with horseradish peroxidase-labelled rabbit anti-mouse antibody (typically used at a 1:2,000 dilution) and incubate for 2 hours with gentle mixing. Be sure that the strips are fully wetted.
- Rinse the strips in 2 ml of PBS for 5 minutes twice as in step 9.
- Wash the strips for several minutes in 0.05 M sodium acetate buffer, pH 5.0, and then discard the solution.
- Put the strips in a plastic box and add 10 ml of sodium acetate buffer with 0.4 ml of 3-amino-9-ethylcarbazole (AEC) in dimethylformamide (DMF). Mix for 2-3 minutes.
- Add 10 µl of H2O2 at 30% and stain each dot until distinct red dots are observed for the reference isolate (2-10 minutes).
- Cut strips (0.5 x 10 cm) of nitrocellulose paper (pore 0.45 µm). Divide each strip into 10 sections of 1 cm in length using a wax pencil and align them on a glass or hard plastic plate.
- Reading the dot-blotting serotyping/serosubtyping test results
- Rinse the strips under running water, align them on a glass plate, and absorb the excess water with filter paper or tilt the plate slightly to dry the strips at room temperature (25°C).
- Grade the staining intensity of each dot (positive, weak, or negative) visually relative to the reference strain.
- When dried, the strips can be taped onto a sheet of paper and kept in a plastic pocket protected from light.
- Preparation of whole-cell suspensions

References
- Arhin, F. F., F. Moreau, J. W. Coulton, and E. L. Mills. Outer membrane proteins and serosubtyping with outer membrane vesicles from clinical isolates of Neisseria meningitidis. Current Microbiology. 1997;34:18-22.
- Clinical Microbiology Procedures Handbook, 3rd edition. ASM. Washington, D.C. 2010;2,540 pages.
- Frasch, C. E., W. D. Zollinger, and J. T. Poolman. Serotype antigens of Neisseria meningitidis and a proposed scheme for designation of serotypes. Rev Infect Dis. 1985;7:504-510.
- Poolman, J. T., P. Kriz-Kuzemenska, F. Ashton, W. Bibb, Dankert J, Demina A, et al. Serotypes and subtypes of Neisseria meningitidis: results of an international study comparing sensitivities and specificities of monoclonal antibodies. Clinical & Diagnostic Laboratory Immunology. 1995;2:69-72.
- Sacchi, C. T., A. P. Lemos, M. E. Brandt, A. M. Whitney, C. E. Melles, C. A. Solari, et al. Proposed standardization of Neisseria meningitidis PorA variable-region typing nomenclature. Clinical & Diagnostic Laboratory Immunology. 1998;5:845-855.
- Sacchi, C. T., A. P. Lemos, A. M. Whitney, C. A. Solari, M. E. Brandt, C. E. Melles, et al. Correlation between serological and sequencing analyses of the PorB outer membrane protein in the Neisseria meningitidis serotyping system. Clinical & Diagnostic Laboratory Immunology. 1998;5:348-354.
- Swaminathan, B., G. M. Matar, M. W. Reeves, L. M. Graves, G. W. Ajello, W. F. Bibb, et al. Molecular subtyping of Neisseria meningitidis serogroup B: comparison of five methods. Journal of Clinical Microbiology. 1996;34:1468-1473.
- Page last reviewed: April 15, 2016
- Page last updated: March 15, 2012
- Content source: