

Chapter 5: Collection and Transport of Clinical Specimens
 ShareCompartir
Printer friendly version [11 pages]
The proper collection and transport of clinical specimens is critical for the isolation, identification, and characterization of agents that cause bacterial meningitis. Optimally, clinical specimens should be obtained before antimicrobial therapy commences in order to avoid loss of viability of the etiological agents. Treatment of the patient, however, should not be delayed while awaiting collection of specimens or results from the laboratory and a specimen should be obtained in all suspect cases as bacterial pathogens can still be detected even after antimicrobial therapy has begun. N. meningitidis, S. pneumoniae, and H. influenzae are fastidious and fragile bacteria. They are more reliably isolated if the clinical specimens are examined as soon as possible after collection. Cerebrospinal fluid (CSF) should be processed in a microbiology laboratory within 1 hour after collection or inoculated into Trans-Isolate (T-I) medium for transport to the laboratory if processing within 1 hour is not feasible. Blood specimens should be immediately inoculated into a blood culture bottle and transported to a microbiology laboratory as soon as possible for overnight incubation and growth of bacteria.
-
It is important to adhere to proper biosafety guidelines while handling potentially infectious clinical specimens in order to maintain a safe working environment for patients, health care workers, and laboratorians. Infection may be transmitted from patient to staff and from staff to patient during the procedures described below. In addition to the agents that cause bacterial meningitis, the patient could have other bacterial or viral agents in either the CSF of blood and both are a great hazard and potentially lethal. Of particular importance are the viruses causing hepatitis and acquired immunodeficiency syndrome. To decrease the risk of transmission of these agents, the recommendations below should be followed:
- Wear latex or nitrile gloves that are impermeable to liquids and change gloves between every patient.
- Dispose of syringes and needles in a puncture-resistant, autoclavable discard container. Do not attempt to re-cap, shear, or manipulate any needle. A new sterile syringe and needle must be used for each patient.
- For transport to a microbiology laboratory, place the specimen in a container that can be securely sealed. Wipe any bottles with CSF or blood on the outside thoroughly with a disinfectant, such as a 70% alcohol swab.
- Do not use povidone-iodine on the rubber septum of a T-I or blood culture bottle.
- Remove gloves and discard in an autoclavable container.
- Wash hands with antibacterial soap and water immediately after removing gloves.
- In the event of a needle-stick injury or other skin puncture or wound, wash the wound liberally with soap and water. Encourage bleeding.
- Report a needle-stick injury, any other skin puncture, or any contamination of the hands or body with CSF to the supervisor and appropriate health officials immediately as prophylactic treatment of the personnel performing the procedure may be indicated.
-
Collection and transport of CSF
The collection of CSF is an invasive procedure and should only be performed by experienced personnel under aseptic conditions. If bacterial meningitis is suspected, CSF is the best clinical specimen to use for isolation, identification, and characterization of the etiological agents. Suspected agents should include N. meningitidis, S. pneumoniae, and H. influenzae and other pathogens in some cases.
-
Preparing for lumbar puncture
If possible, three tubes (1 ml each) of CSF should be collected for microbiology, chemistry, and cytology. If only one tube of CSF is available, it should be given to the microbiology laboratory. Because the presence of blood can affect cultures of CSF, if more than one tube of CSF is collected from a patient, the first tube collected (which could contain contaminating blood from the lumbar puncture) should not be the tube sent to the microbiology laboratory.
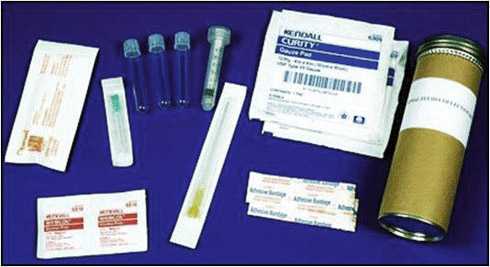
The kit for collection of CSF should contain (Figure 1):
- Skin disinfectant: 70% alcohol swab and povidone-iodine
- Alcohol with concentrations greater than 70% should not be used because the increased concentrations result in decreased bactericidal activity. Do not use alcohol with glycerol added to it.
- Sterile gloves
- Be sure to check the expiration date.
- Sterile gauze
- Surgical mask
- Adhesive bandage
- Lumbar puncture needle
- 22 gauge/89 mm for adults
- 23 gauge/64 mm for children
- Sterile screw-cap tubes
- Syringe and needle
- Transport container
- T-I medium (if CSF cannot be analyzed in a microbiological laboratory immediately)
- T-I should be refrigerated at 4°C and added to the kit immediately before use in the field.
- Venting needle (only if T-I is being used)
- Instructions for lumbar puncture and use of T-I medium
- Skin disinfectant: 70% alcohol swab and povidone-iodine
-
Lumbar puncture procedure
Follow all appropriate biosafety precautions (see Section I).
- Gather all materials from the CSF collection kit and a puncture-resistant autoclavable container for used needles.
- Wear surgical mask and sterile latex or nitrile gloves that are impermeable to liquids and change gloves between every patient.
- Label the collection tubes with appropriate information: patient’s name, date and time of specimen collection, and Unique Identification Number. Be sure this number matches the number on both the request and report forms.
- Ensure that the patient is kept motionless during the lumbar puncture procedure, either sitting up or lying on the side, with his or her back arched forward so that the head almost touches the knees in order to separate the lumbar vertebrae during the procedure (Figure 2).
- Disinfect the skin along a line drawn between the crests of the two ilia with 70% alcohol and povidone-iodine to clean the surface and remove debris and oils. Allow to dry completely.
- Position the spinal needle between the 2 vertebral spines at the L4-L5 level and introduce into the skin with the bevel of the needle facing up.
- Accurate placement of the needle is rewarded by a flow of fluid, which normally is clear and colorless.
- Remove CSF (1 ml minimum, 3-4 ml if possible) and collect into sterile screw-cap tubes. If 3-4 ml CSF is available, use 3 separate tubes and place approximately 1ml into each tube.
- Withdraw the needle and cover the insertion site with an adhesive bandage. Discard the needle in a puncture-resistant, autoclavable discard container.
- Remove mask and gloves and discard in an autoclavable container.
- Wash hands with antibacterial soap and water immediately after removing gloves.
- Transport the CSF to a microbiology laboratory within 1 hour for culture and analysis.
- If that is not possible, inoculate CSF into T-I medium (see Section I.C. below).
- If T-I is not available, incubate CSF at 35-37°C with ~5% CO2 (see Section I.D. below) and store in an approved location if the laboratory is closed.
- In the event of a needle-stick injury or other skin puncture or wound, wash the wound liberally with soap and water. Encourage bleeding.
- Report a needle-stick injury, any other skin puncture, or any contamination of the hands or body with CSF to the supervisor and appropriate health officials immediately as prophylactic treatment of the personnel performing the procedure may be indicated.
-
Inoculating and transporting T-I medium
T-I is a biphasic medium that is useful for the primary culture of meningococci and other etiological agents of bacterial meningitis (S. pneumoniae and H. influenzae) from CSF (Figure 3) (1). It can be used as a growth medium as well as a holding and transport medium. The preparation of T-I media is described in the Annex. T-I media should be stored at 4°C and warmed to room temperature (25°C) before use.
- Label the T-I bottle with appropriate information: patient name, date and time of CSF inoculation, and Unique Identification Number. Be sure this number matches the number on both the request and report forms.
- Use sterile forceps to pull the aluminum cover of a T-I bottle away from the rubber stopper and disinfect the stopper with 70% alcohol. Allow to dry.
- Do not use povidone-iodine as it may be carried into the medium by the passing needle and would inhibit growth of bacteria.
- Do not completely remove the aluminum cover.
- Use a sterile syringe and needle to inoculate 0.5-1.0 ml of CSF into the T-I medium. The remaining CSF should be kept in the collection tube. It should not be refrigerated, but should be maintained at room temperature (20-25°C) before Gram staining and other tests. Discard the needle in a puncture-resistant, autoclavable discard container.
- After inoculation, invert the T-I bottle several times to mix.
- If transport to a reference laboratory is delayed (next day or longer), insert a venting needle (sterile cotton-plugged hypodermic needle) through the rubber stopper of the T-I bottle, which will encourage growth and survival of the bacteria.
- Be sure that the venting needle does not touch the broth.
- Incubate inoculated T-I medium at 35-37°C with ~5% CO2 (or in a candle-jar) overnight or until transport is possible. If transportation is delayed more the 4 days, remove the vented T-I bottle from the incubator or candle jar and place at room temperature until shipment.
- Remove the venting needle and wipe the rubber stopper with 70% alcohol before shipping. It is essential to avoid contamination when sampling the bottles to obtain specimens aseptically.
- If the T-I bottle can be transported to a reference laboratory the same day, do not vent the bottle until it arrives in the receiving laboratory. Upon arrival, vent the T-I bottle, incubate at 35-37°C with ~5% CO2 (or in a candle-jar), and observe daily for turbidity in the liquid phase for up to 7 days.
- If turbidity is observed, culture onto a blood agar plate (BAP) and a chocolate agar plate (CAP) immediately (see Chapter 6: Primary Culture and Presumptive ID).
- If no turbidity is observed, culture onto a BAP and a CAP on day 4 and day 7.
- If T-I medium appears to be contaminated, selective media such as Modified Thayer-Martin and chocolate agar with bacitracin may be used.
-
Transporting CSF specimens without T-I media
CSF specimens should be transported to a microbiology laboratory as soon as possible. Specimens for culture should not be refrigerated or exposed to extreme cold, excessive heat, or sunlight. They should be transported at temperatures between 20°C and 35°C. For proper culture results, CSF specimens must be plated within 1 hour (Figure 4). See Chapter 6: Primary Culture and Presumptive ID for instructions on processing CSF once it has arrived in the laboratory.
If a delay of several hours in processing CSF specimens is anticipated and T-I medium is not available, incubating the specimens (with screw-cap loosened) at 35-37°C with ~5% CO2 (or in a candle-jar) may improve bacterial survival.
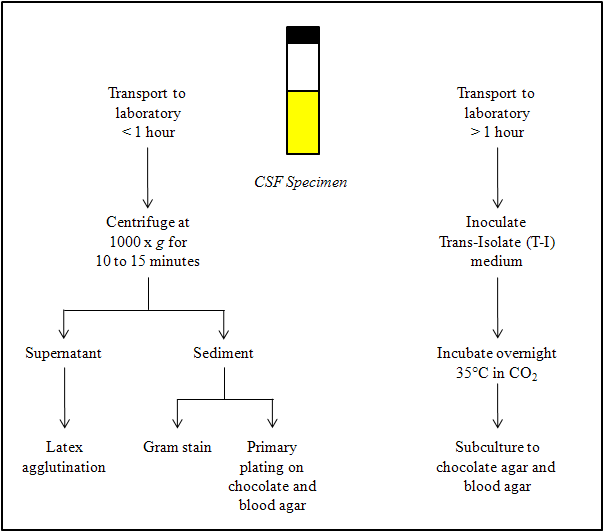
Figure 4 is an algorithm describing how to process cerebrospinal fluid (CSF) without T-I media...view larger
-
-
Collection and transport of blood specimens
Blood should be collected when a spinal tap is contraindicated, cannot be performed for technical reasons, or when bacteremia is suspected. Bacteremia can occur with or without meningitis.
-
Sensitivity of blood cultures
Several variables affect the sensitivity of blood cultures: the number of collections, the volume of each collection, the steps taken to inhibit or neutralize bactericidal properties of blood, and the age of the patient. It may be difficult to collect more than 3 ml of blood from a child, but 1-3 ml is considered adequate. Collected blood should be diluted in blood culture broth in order to obtain blood cultures. Typically, 1-2 ml of blood from a child is added to 20 ml of blood culture broth and 5-10 ml of blood from an adult is added to 50 ml of blood culture broth. It is important to use appropriate ratios of blood to culture broth for optimal bacterial growth. The recommendations of the culture broth manufacturer should be closely followed.
Blood should be cultured in trypticase soy broth (TSB) or brain heart infusion (BHI) broth with a growth supplement (such as IsoVitaleX or Vitox) to support growth of other fastidious organisms such as H. influenzae. Neutralization of normal bactericidal properties of blood and potential antimicrobial agents is accomplished by adding chemical inhibitors such as 0.025% sodium polyanetholesulfonate (SPS) to culture media and by diluting the blood. SPS, which has anticoagulant, antiphagocytic, anticomplementary, and antilysozymal activity, may be inhibitory to bacterial growth of Neisseria species if used in higher concentrations. The preparation of blood culture media is described in the Annex.
-
Preparing for venipuncture
The materials required for venipuncture are:
- Skin disinfectant: 70% alcohol swab and povidone-iodine
- Alcohol with concentrations greater than 70% should not be used because the increased concentrations result in decreased bactericidal activity. Do not use alcohol with glycerol added to it.
- Sterile gloves
- Be sure to check the expiration date
- Sterile gauze
- Adhesive bandage
- Cotton ball
- Tourniquet
- Syringe
- Needle
- A 21 gauge/20-25 mm needle is generally used for adults
- A 23 gauge/20-25 mm needle is generally used for children
- Puncture-resistant, autoclavable container
- Thermal insulated transport carrier (such as extruded polystyrene foam)
- Blood culture bottle
- Skin disinfectant: 70% alcohol swab and povidone-iodine
-
Venipuncture and inoculating blood culture bottles
If possible, 1-3 ml of blood should be collected from a child, though it may be difficult to collect more than 1 ml, and 5-10 ml of blood should be collected from an adult. Collected blood should be diluted in blood culture broth in order to obtain blood cultures. Blood cannot be transported before being placed in a blood culture bottle because the syringes do not contain any anticoagulant and the blood will coagulate within a few minutes. A diagram of the proper method for collecting blood from the arm is shown in Figure 5.
If using alternative blood collection methods, such as a blood collection tube or a partially evacuated blood collection tube, immediately inoculate specimens into the blood-culture bottle using a needle and syringe after disinfecting the top of the bottle with 70% alcohol.
- Gather all materials required for venipuncture (listed above).
- Note: blood culture bottles should be stored at 4°C when not in use and pre-warmed to room temperature (25°C) or 37°C before inoculation.
- Label the blood culture bottle with appropriate information: patient name, date and time of blood culture bottle inoculation, and Unique Identification Number. Be sure this number matches the number on both the request and report forms.
- Disinfect the rubber septum of the blood culture bottle with a 70% alcohol swab and allow it to dry.
- Do not use povidone-iodine on the rubber septum as it may be carried into the medium by the passing needle, thus inhibiting the growth of bacteria.
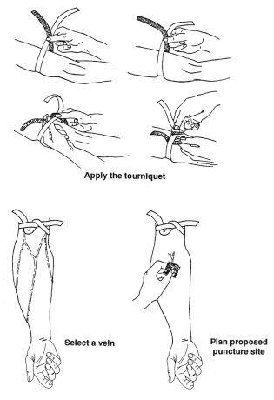
- Select an arm and apply a tourniquet to restrict the flow of venous blood. The large veins of the forearm are illustrated in Figure 5. The most prominent vein is usually chosen.
- Wipe the skin with a 70% alcohol swab and then povidone-iodine. Allow to dry. If the vein is palpated again, change gloves and repeat the skin disinfection.
- Insert the needle into the vein with the bevel of the needle face up. Once the needle has entered the vein, withdraw the blood by pulling back on the barrel of the syringe in a slow, steady manner. Air must not be pumped into the vein. After the desired amount of blood is obtained, release the tourniquet and place a sterile cotton ball or gauze over the insertion site while holding the needle in place.
- Withdraw the needle and have the patient hold the cotton ball or gauze firmly in place until the wound has stopped bleeding. Cover the insertion site with an adhesive bandage.
- Immediately (within 1 minute) inoculate the blood into the blood culture medium to prevent the blood from clotting in the syringe. Do not attempt to recap the needle and discard it in a puncture-resistant, autoclavable discard container. Wipe the surface of the blood culture bottle with a 70% alcohol swab.
- In general, follow the manufacturer’s instructions for inoculating the specific size of blood culture bottle with the correct volume of blood.
- For blood from young children, add 1-2 ml of blood into 20 ml of blood culture broth (approximately a 1:10 to 1:20 dilution).
- For blood from adults, add 5-10 ml of blood into 50 ml of blood culture broth (approximately a 1:5 to 1:10 dilution).
- After inoculation, swirl the bottle several times to mix and transport to a microbiology laboratory immediately (See section III.D.)
- If immediate transport to a microbiology laboratory is not feasible, place the inoculated blood culture bottle in an incubator at 35-37°C with ~5% CO2 (or in a candle-jar) until transport to a microbiology laboratory is possible.
- Inoculated blood culture bottles should not be placed in the refrigerator.
- Remove gloves and discard in an autoclavable container.
- Wash hands with antibacterial soap and water immediately after removing gloves.
- Gather all materials required for venipuncture (listed above).
-
Transporting blood culture bottles
Ideally, inoculated blood culture bottles should be transported to a microbiology laboratory immediately for overnight incubation at 35-37°C with ~5% CO2 (or in a candle-jar) and subsequent culture onto a BAP and CAP. All inoculated blood culture media should be protected from temperature extremes (not less than 18°C or more than 37°C) with a transport carrier and thermal insulator (such as extruded polystyrene foam).
-

References
- Ajello, G. W., Feeley, J. C., Hayes, P. S., Reingold, A.L., Bolan, G., Broome, C. V., et al. Trans-Isolate medium: A new medium for primary culturing and transport of Neisseria meningitidis, Streptococcus pneumoniae, and Haemophilus influenzae. Journal of Clinical Microbiology 1984;20:55-58.
- Page last reviewed: April 15, 2016
- Page last updated: March 15, 2012
- Content source: