

Epi Info™ User Guide - Companion for Android
 ShareCompartir
Epi Info™ User Guide
Collecting & Analyzing Data on an Android Device
Transfer Data from Mobile Device
- Select Create Sync File from the Collect Data menu or from the options menu. This feature is only accessible from the options menu on a phone.
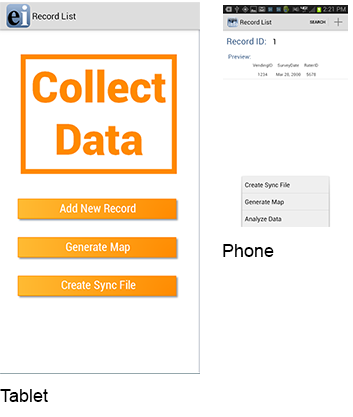
Figure 6.27: Create Sync File
- Create a password for the sync file. This password will be required to access the sync file and download the information to a computer. There are no password requirements; however, it is recommended that users create passwords to ensure secure information transfer with encrypted files.
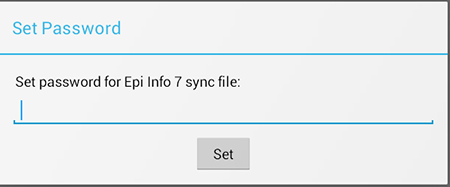
Figure 6.28: Set Sync File Password
- Click OK and connect the device to your PC.
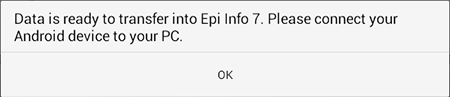
Figure 6.29: Sync File Created
- Open the Epi Info™ software on your PC.
- From the Epi Info™ main menu, select Enter Data or select Tools > Enter Data. The Enter tool opens.
- Open the project and form used to collect the data on the mobile device.
- From the File menu, select Import Data > From mobile device.
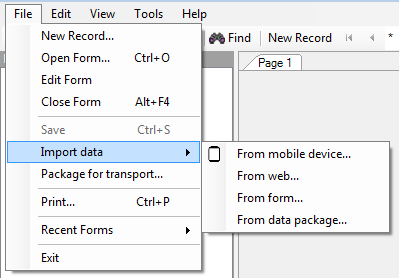
Figure 6.30: Import Data from mobile device
The Import phone data dialog box appears.

Figure 6.31: Import Mobile Sync File Dialog Box
- Click the Browse button next to the Mobile sync file text box and select the sync file created with the mobile device. The file will be located in the Downloads > EpiInfo> SyncFiles folder on the mobile device.
- Click Open. Note the file format, “Epi Info for Android” sync files.
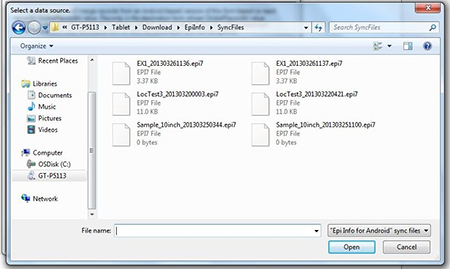
Figure 6.32: Select a Data Source Dialog Box
- Enter the password created for the sync file in the Password field.
- Select the Type of Import from the options listed.
- Update and append records – Records in the destination form containing the same GlobalRecordId values as the source form will be updated (overwritten) if there is new information. However, values in the destination table will never be overwritten with a null or missing value. All other records will be appended (added) to the end of the table.
- Update records only – Records in the destination form containing the same GlobalRecordId values as the source form will be updated (overwritten) if there is new information. However, values in the destination table will never be overwritten with a null or missing value. All other records will be ignored.
- Append records only – All records in the source form will be appended (added) to the end of the table. No records will be updated (overwritten).
Note: Import operations are permanent and irreversible. Be sure that the form structures are the same (including all form names and form table names) before proceeding.
- Click Import. Import Complete will appear at the bottom of the dialog box upon successful completion of the import.
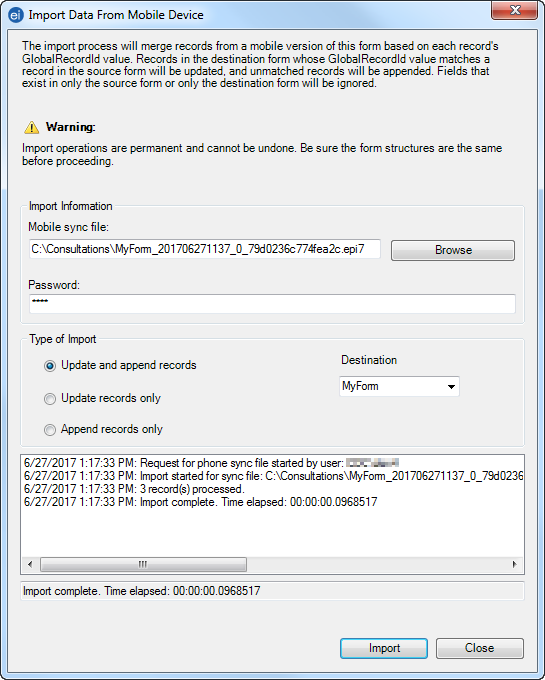
Figure 6.34: Import Complete
- Click Close.
The data displays in the Enter tool at the end of the Record List. This information is now ready to be analyzed by Classic Analysis or Visual Dashboard.
NOTE: You might need to disconnect the cable from the Android device into your PC and reconnect it in order for the PC to recognize updated files on the device. In some devices, users had to restart the device in order for the PC to recognize updated files on the device.
- Page last reviewed: June 27, 2017
- Page last updated: June 27, 2017
- Content source: