

Interim Duodenoscope Sampling Method
 ShareCompartir
Interim Sampling Method for the Duodenoscope – Distal End and Instrument Channel
Updated: August 19, 2015
CDC Disclaimer: The sample and culture protocols were released as part of the larger CDC Interim Duodenoscope Surveillance Protocol as a guide for facilities considering cultures of duodenoscopes to assess the adequacy of their duodenoscope reprocessing. We recommend reading the CDC Interim Duodenoscope Surveillance Protocol first. Due to the increasing concerns regarding antimicrobial resistant bacteria, we focused on protocols that capture and identify bacteria. Facilities can expand their surveillance program to include additional organisms.
This protocol has not been validated and is one approach to culturing duodenoscopes. The protocol is intended to provide facilities who are considering culturing with a starting point for a protocol that can be adapted for use. The protocol is still being developed and evaluated for the major duodenoscope types. This is an interim protocol and will be updated accordingly.
Purpose
This method is for use in the field to sample ‘ready-to-use’, fully reprocessed duodenoscopes (after drying) for bacteria specifically located on the distal end; and for collecting samples from the instrument channel (via the instrument port to the distal end). Ideally, two personnel familiar with the instrument and who are capable of aseptic technique should perform this protocol. One will hold the duodenoscope (facilitator) while the other person samples (sampler) accordingly. It is important to sample gently, while thoroughly, in order for optimal sampling and maintaining the integrity of the duodenoscope.
Additional points to consider (see the Frequently Asked Questions document for further details)
- This testing is not meant to assure sterility of the duodenoscope.
- The samples are not considered clinical or patient samples, but are from a medical device.
- While this protocol maintains the separation of the two samples (e.g. instrument channel flush sample, distal end/ elevator mechanism brush sample), a facility may consider consolidating or combining the samples into one container.
Materials and Reagents
- Sterile brush typically used for cleaning with the following considerations:
- A brush consistent with duodenoscope model manufacturer recommendations for cleaning in the area of, and around, the elevator mechanism;
- an established validated sterilization protocol should be used for non-sterile disposable brushes prior to sampling, otherwise interpretations of positive cultures may be difficult
- Sterile 0.01M phosphate buffered saline (PBS) with 0.02% Tween®-80 solution (PBST)
- Buffer options include Teknova (#P3875) and Hardy (#U334)
- PBST can also be made in the laboratory under aseptic conditions
- Sterile leak-proof specimen cups (120 mL) (one example – Fisher Scientific, #14-375-462)
- Sterile water, 50 mL per duodenoscope
- Examples include reverse osmosis (RO), irrigation water, water for injection (WFI)
- Manufactured prepared sterile water option, Hardy (#U336)
- Sterile 60-cc syringes
- Additional materials: Parafilm®, Sterile alcohol pads, Hair coverings, Sterile gloves, Permanent marker, Sterile gowns, Sterile diaper pads, Face masks/ shields, Tray with sterile liner, Labels
PDF for Download
Interim Sampling Method For The Duodenoscope - Distal End And Instrument Channel
Interim Duodenoscope Sampling Method [PDF – 375 KB]
Interim Duodenoscope Surveillance Protocol
Definitions
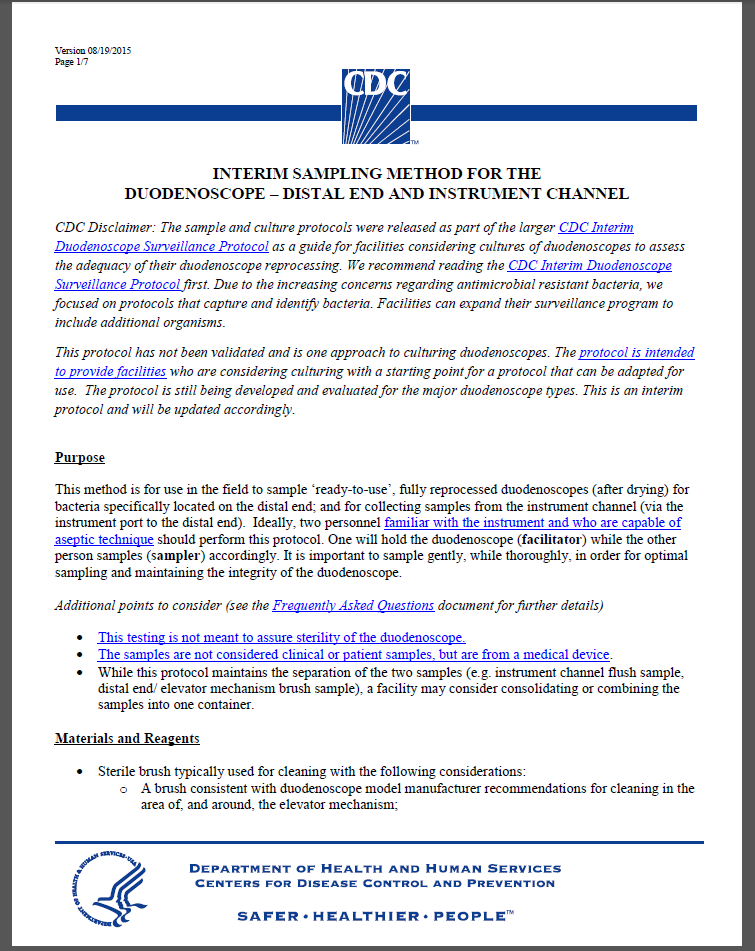
Distal end – Includes the elevator mechanism (e.g. forceps elevator or elevator) and elevator recess for duodenoscopes with sealed elevator wire channel; and elevator mechanism, elevator recess, and elevator channel for duodenoscopes with unsealed elevator wire channel.
Lowered/ closed position – Notes the position of the elevator mechanism being parallel or within the elevator recess relative to the distal end of the duodenoscope, Figure 1a.
Raised/ open position – Notes the position of the elevator mechanism being perpendicular to the distal end of the duodenoscope, Figure 1b.
Figure 1. Distal end, Model TJF-Q180V (Olympus) – Illustrating the orientation of forceps elevator in the (a) ‘lowered/ closed’ position and (b) ‘raised/ opened’ position (photos taken by James Gathany, CDC).
Method – Preparation of Materials
In Laboratory: Aseptically prepare specimen containers with PBST and sterile irrigation water if these reagents are not commercially available or already prepared
- If unable to obtain ready to use sterile brushes, prepare autoclavable brushes: Gather and wrap brush for use on each duodenoscope in appropriately-sized autoclave pouches; autoclave using approved sterilization cycles
- In a biological safety cabinet, aseptically prepare the following:
- Fill sterile leak-proof specimen containers with 50 mL PBST; label for brush samples with sample ID/ date
- Sterile water: aliquot 50 mL into sterile leak proof specimen containers; label for instrument channel flush with sample ID/ date
- Repeat step (2) for the total number of duodenoscopes to be sampled
- Save the remainder of stock PBST and irrigation water as negative controls
In the area where the duodenoscope(s) will be sampled:
Duodenoscopes should be sampled on a clean surface away from traffic, obvious airflow (e.g. vents), and potential contamination with water. A sectioned-off area of a reprocessing room or a separate room can be designated for duodenoscope sampling.
- Clean and disinfect the counter where sampling of the duodenoscope(s) will be performed with an EPA approved disinfectant for hard, non-porous surfaces observing manufacturer’s instructions on contact time and disinfection procedure
- Sampler and Facilitator: Don sterile gowns, face masks/shields, hair coverings and gloves
- Prepare the sampling materials by laying out the sterile diaper pad; placing respectively labeled sampling containers, pre-moistening PBST tubes in a rack, as well as other needed items (e.g. 60-cc syringes)
- Gather sterile brushes for sampling of the duodenoscopes
Method – Elevator Mechanism and Channel
- Sampler and Facilitator: Don sterile gloves
-
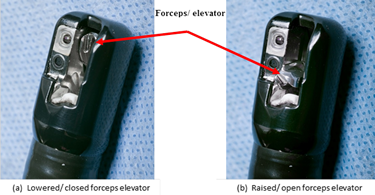
Facilitator: Sanitize the outer surface of the duodenoscope tip with a sterile alcohol pad, but use caution to not wipe the elevator mechanism and lens face at the distal end that will be sampled with the sterile brush (Figure 2); allow to air dry prior to sampling. Place duodenoscope in tray with sterile liner until sampling
Figure 2. Clean the outer surface of the duodenoscope tip with a sterile alcohol pad but take care to not wipe the elevator mechanism and lens face (photo taken by CDC DHQP).
- Facilitator: Obtain the sterile brush and open the pouch for sampler to access brush
- Facilitator: Using the controller, set the elevator mechanism in the lowered/ closed position (Figure 1a) and orient the distal end (relative to the Sampler) for optimal sampling
- Sampler: Dip the sterile brush into the labeled PBST specimen container to pre-moisten the brush and press excess fluid from the brush inside the inner walls of the container
-
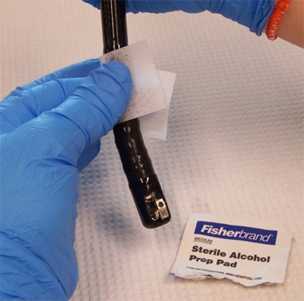
Sampler: Using the pre-moistened sterile brush, with twisting motion of the brush, sample the inside of the elevator mechanism, recess, and channel in the lowered/ closed position (Figure 3a)
Figure 3. Sampling the elevator mechanism in the (a) ‘lowered/ closed’ position, (b) ‘raised/ opened’ position, and (c) sampling the elevator mechanism and lens face (photos taken by CDC DHQP). Note: the brush pictured below is no longer available and is used for demonstration purposes only.
- Facilitator: Using the controller, set the elevator mechanism in the raised/ open position (Figure 1b) and then orient the distal end (relative to the Sampler) for optimal sampling inside the mouth of the specimen container
- Sampler: Using the sterile brush, firmly brush under the elevator mechanism in the raised/ open position (Figure 3b) and scrub the face of the lens (Figure 3c)
- Sampler: Drop the sterile brush portion inside the mouth of the corresponding labeled (i.e. sample ID, date) specimen container
- Facilitator: Tighten the lid, and secure with Parafilm©
Method – Instrument Channel
- Sampler and Facilitator: Replace and don sterile gloves if needed
- Facilitator: Obtain a sterile 60-cc syringe for the instrument channel sample, fill syringe with 50 mL sterile water from pre-filled and labeled specimen container, and hand to the Sampler
- Facilitator and Sampler: Coordinate how to hold the duodenoscope at the optimal angle for the Sampler to flush the instrument channel via the instrument port and the Facilitator to collect the sample in the specimen container
- Sampler: Flush the instrument channel with 50 mL of sterile water, specifically from the biopsy valve to the distal end to collect sample in sterile, labelled specimen container
- Sampler: Remove the 60-cc syringe and fill with air, then re-attach it to the instrument port and flush the air through the channel to flush out any remaining fluid into the sterile specimen container
- Facilitator: Tighten the lid, and secure with Parafilm©
Storage and Shipping Considerations
Once all the samples are collected, the samples should be transferred following appropriate facility procedures to a(n) clinical, environmental, or infectious diseases laboratory within the facility, healthcare system, or an external contract company for processing and culturing.
- Samples should be placed at 4ºC or on cold-paks for storage until further processing or shipping. Samples should not be stored beyond 24 hours after sampling
- Send the following samples to an approved laboratory for processing and culture:
- Save and send remainder of unused water (negative control)
- Save and send remainder of unused PBST (negative control)
- Instrument channel flush (50 ml)
- Distal end and elevator mechanism sample (brush submerged in 50 ml)
- When packaging for overnight shipping:
- Seal lids with Parafilm©;
- Place each specimen container in its own ziplock bag;
- Remainder of unused stock PBST and sterile irrigation water (negative control) in their own ziplock bags;
- All bags with tubes may be placed in several large outer bags
Duodenoscope Handling after Sampling
Holding duodenoscopes out of use while surveillance culture results are pending should be considered, especially if performing surveillance cultures after each use. Any duodenoscope found to be contaminated should not be returned to use until remedial actions have been followed. See the CDC Interim Duodenoscope Surveillance Protocol for specific details on remedial actions.
Limitations
The protocols are not yet validated, i.e. the sensitivity, specificity and limits in quantitation or detection are not established for all organisms. Environmental sampling and processing methods are to be used for investigational or research purposes. The sampling efficiency of this method has not been established
- Page last reviewed: September 2, 2015
- Page last updated: September 3, 2015
- Content source: