

Preparation and Collection of Specimens
 ShareCompartir
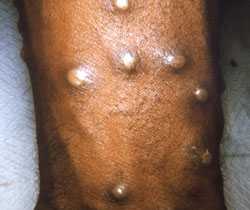
Procedures and materials used will vary depending on the phase of the rash.
Effective communication and precautionary measures between specimen collection teams and laboratory staff is essential to maximizing safety in the manipulation of monkeypox specimens.
This is especially relevant in hospital settings, where laboratories routinely process specimens from patients with a variety of infectious and/or noninfectious conditions.
A labeling system should clearly distinguish all specimens, including those from monkeypox patients which require special handling.
Laboratory exposures to poxviruses occur primarily through needle-stick injuries, direct contact with the specimen or aerosols that may be generated by laboratory procedures. Sharps should not be included with any specimens, and should be disposed of in appropriate puncture-resistant containers for autoclave of infectious waste.
Collection of specimen can begin after appropriate consultations have been made. Procedures and materials used will vary depending on the phase of the rash.
Collection of specimens for monkeypox diagnosis
Possible human cases of monkeypox should be reported to your local hospital epidemiologist and/or infection control personnel, who will contact your state health department. If appropriate, the state health department will contact the Centers for Disease Control and Prevention (CDC). Consultation with the state epidemiologist, state health laboratory, and CDC is necessary before sending specimens to CDC.
Personnel who collect specimens should use personal protective equipment (PPE) in accordance with recommendations for standard, contact, and droplet precautions [PDF – 226 pages]. Specimens should be collected in the manner outlined below. When possible, use plastic rather than glass materials for specimen collection.
The following types of specimens should be collected in accordance with stage of disease:
| Disease Phase | Specimens to Collect |
|---|---|
| Prodrome | Tonsillar tissue swab Nasopharyngeal swab Acute serum and whole blood |
| Rash* | |
| Macules or Papules | Tonsillar tissue swab Lesion biopsy Acute serum and whole blood |
| Vesicles or Pustules | Lesion fluid, roof, or biopsy Electron microscopy grid (if supplies available) Acute serum and whole blood |
| Scabs or Crusts | Lesion scab or crust Acute serum and whole blood |
| Post-Rash | Convalescent serum |
* More than one lesion should be sampled, preferably from different locations on the body and/or from different looking lesions.
Tonsillar Tissue Swab Collection
Materials needed:
- 2—Sterile screw-capped plastic tube with O-ring (1.5 to 2 mL)
- 2—Sterile dry polyester or Dacron swabs
Procedure:
- Swab or brush posterior tonsillar tissue with a sterile dry polyester or Dacron swab.
- Break off end of applicator into a 1.5 or 2 mL screw-capped tube with O-ring or place entire swab in a sterile container. DO NOT ADD ANY VIRAL TRANSPORT MEDIA.
Nasopharyngeal Swab Collection
Materials needed:
- 2—Sterile screw-capped plastic tube with O-ring (1.5 to 2 mL)
- 2—Sterile dry polyester or Dacron swabs
Procedure:
- Swab the nasopharynx with a sterile dry polyester or Dacron swab.
- Break off end of applicator into a 1.5 or 2 mL screw-capped tube with O-ring or place entire swab in a sterile container. DO NOT ADD ANY VIRAL TRANSPORT MEDIA.
Lesion Biopsy Collection
Materials needed:
- 1—Punch biopsy kit (2.5 mm for pediatrics; 3.5 or 4 mm for adults)
- 1—Needle driver
- 1—Sutures
- 1—Suture removal kit
- 1—Container of 10% neutral buffered formalin
- 2—Sterile screw-capped plastic tube with O-ring (1.5 to 2 mL)
- Multiple—Alcohol wipes
Procedure:
- Use appropriate sterile technique and skin sanitation.
- Biopsy 2 lesions with 3.5 or 4 mm biopsy punch (2.5 mm for pediatrics).
- Place one biopsy specimen in formalin.
- lace one biopsy specimen in a 1.5 to 2 mL screw-capped plastic vial with O-ring. DO NOT ADD ANY VIRAL TRANSPORT MEDIA.
Lesion Fluid Collection
Lesion fluid can be collected by swab, smear or touch prep slides. In addition, if electron microscopy materials are available this type of specimen collection can also be used.
Lesion Fluid Swab
Materials needed:
- 2—Disposable scalpel with no. 10 blade, or
- 2—26 Gauge needle
- 4—Sterile screw-capped plastic vials with O-ring (1.5 to 2 mL)
- 4–8—Sterile dry polyester or Dacron swabs
- Multiple—Alcohol wipes
Procedure:
- Sanitize lesion with an alcohol wipe, allow to dry.
- Use a disposable scalpel (or a sterile 26 Gauge needle) to open, and remove, the top of the vesicle or pustule (do not send the scalpel or needle). Retain lesion roof for testing.
- Swab the base of the lesion with a sterile polyester or Dacron swab.
- Break off end of applicator into a 1.5 or 2 mL screw-capped tube with O-ring or place entire swab in a sterile container. DO NOT ADD ANY VIRAL TRANSPORT MEDIA.
Lesion Fluid Smear or Touch Prep Slide
Materials needed:
- 2—Disposable scalpel with no. 10 blade, or
- 2—26 Gauge needle
- 4—Clean plastic or glass microscope slides
- 4—Plastic single-slide holders
- 4–8—Sterile dry polyester or Dacron swabs (if needed)
- Multiple—Alcohol wipes
- Parafilm (optional)
Procedure:
- Sanitize lesion with an alcohol wipe, allow to dry.
- Use a disposable scalpel (or a sterile 26 Gauge needle) to open, and remove, the top of the vesicle or pustule (do not send the scalpel or needle). Retain lesion roof for testing.
- Scrape the base of the vesicle or pustule with the blunt edge of the scalpel, or with the end of an applicator stick or swab.
- Smear the scrapings onto a clean microscope slide.
- Apply a microscope slide to the vesicular or pustular fluid multiple times, with progressive movement of the slide, to make a touch prep.
- Allow slides and grids to air dry for approximately 10 minutes.
- Store slides from different patients in separate plastic slide holders to prevent cross-contamination (parafilm may be used to wrap the slide holder to prevent accidental opening).
Electron Microscopy Grid
Materials needed:
- 2—Disposable scalpel with no. 10 blade, or
- 2—26 Gauge needle
- 2–4—Formvar/carbon-coated mesh electron microscopy grids
- 1—Electron microscopy quality forceps
- 1—Electron microscopy grid box
- Multiple—Alcohol wipes
Procedure:
- Sanitize lesion with an alcohol wipe, allow to dry.
- Use a disposable scalpel (or a sterile 26 Gauge needle) to open, and remove, the top of the vesicle or pustule (do not send the scalpel or needle). Retain lesion roof for testing.
- Lightly touch the “shiny side” of an electron microscope grid to the unroofed base of the lesion.
- Repeat this procedure two more times, varying the pressure applied to the unroofed lesion (lighter or firmer pressure).
- Place in grid box and record which slot is used for each patient specimen.
Lesion Roof Collection
Materials needed:
- 2—Disposable scalpel with no. 10 blade, or
- 2—26 Gauge needle
- 4—Sterile screw-capped plastic vials with O-ring (1.5 to 2 mL)
- Multiple— Alcohol wipes
Procedure:
- Sanitize lesion with an alcohol wipe, allow to dry.
- Use a disposable scalpel (or a sterile 26 Gauge needle) to open, and remove, the top of the vesicle or pustule (do not send the scalpel or needle).
- Place the skin of the vesicle top into a 1.5 to 2 mL sterile screw-capped plastic tube with O-ring. DO NOT ADD ANY VIRAL TRANSPORT MEDIA.
Scab or Crust Collection
Materials needed:
- 1—26 Gauge needle
- 2—Sterile screw-capped plastic vials with O-ring (1.5 to 2 mL)
- Multiple—Alcohol wipes
Procedure:
- Sanitize skin with an alcohol wipe, allow to dry.
- Use a 26 Gauge needle to pick or dislodge at least 4 scabs; two scabs each from at least two body locations
- Place scabs from each location in separate sterile O-ring vials.
Acute/Convalescent Serum and Whole Blood Collection
Materials needed:
- 1—5 or 10 cc syringe with needle
- 1—Vacutainer holder
- 2—Vacutainer needles
- 1—10 cc red/gray, gold, or red-topped serum separator tube for serum collection
- 1—Lavender-topped tube (potassium EDTA) for whole blood collection
Blood Collection Procedure:
- Collect 7 to 10 cc of patient blood into a red/gray (marbled), gold, or red topped serum separator tube when patient is first identified.
- Spin tubes to separate serum.
- Save the serum in at least 2 aliquots, 1 for immediate testing and the other for paired sera testing at the convalescent –stage of disease.
- Collect 3 to 5 cc of whole blood into a lavender-topped tube.
- Gently invert the tube to mix the blood with the anticoagulant.
- Obtain convalescent-phase serum 4 to 6 weeks after initial acute-phase serum collection.
- Send convalescent-phase serum with the remaining acute-phase serum aliquot.
Post-Collection Procedures
- After specimen collection is completed, PPE worn by the specimen collector should be removed.
- Disposable equipment (e.g., gown, gloves, mask) should be placed in a biohazard bag for disposal with other medical waste.
- Reusable equipment (e.g., goggles, faceshield) should be disinfected and set aside for reprocessing. If cloth gowns are used, they should be placed in a bag with other contaminated linens in the patient’s room.
- Needles and other sharp instruments should be placed in a sharps container.
- Contaminated waste generated during specimen collection should be handled in accordance with existing facility procedures and local or state regulations for regulated medical waste.
- Each specimen should be labeled with the patient’s name, collection date, type of specimen, and body location for lesion specimens.
- Specimens, excluding formalin fixed specimens and EM grids, may be stored at 4⁰C or -70⁰C if shipping is expected to occur >24 hours after collection. Formalin fixed specimens and EM grids may be stored at 4⁰C. These types of specimens should never be frozen.
- Place specimens from a single patient into a biohazard bag labeled with the patient’s name and date of birth.
- Blood tubes should be placed in individual Styrofoam holders.
- All specimens, excluding those in formalin, should be shipped on gel packs at 4⁰C. Formalin fixed specimens should be shipped at room temperature.
- Specimens should be packaged and shipped in accordance with IATA rules and regulations for diagnostic specimens (UN 3373).
- Page last reviewed: May 11, 2015
- Page last updated: May 11, 2015
- Content Source: