

Anthrax: Collecting, Preparing, and Shipping Serum Samples to CDC for Serology Testing
 ShareCompartir
Do not ship any specimens or samples without first obtaining authorization from both your state health department and CDC. Please contact CDC Emergency Operations Center at 1-770-488-7100 to coordinate anthrax testing and for further shipping instructions.
An acute serum sample for lethal factor (LF) toxin testing can be collected from 0 to 18 days after suspected exposure or the onset of symptoms. Earlier is preferred due to steady but gradual declines in toxin levels during antimicrobial therapy.
Serology testing will only be conducted in paired serum samples submitted at the same time, including an acute (≤7 days after symptom onset) and a convalescent-phase (14–35 days after symptom onset) specimen. It is recommended that the convalescent-phase specimen be taken 2 weeks after the acute specimen.
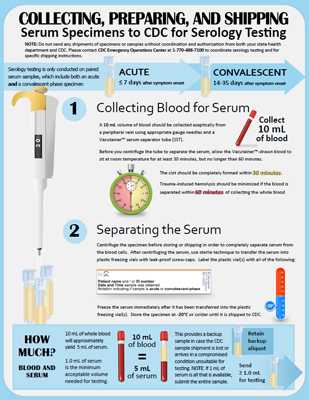 1. Collecting Blood for Serum
- Collect 10 mL of blood aseptically from a peripheral vein using the appropriate gauge needles and a Vacutainer™ serum separator tube (SST); this will yield approximately 5 mL of serum.
- Before you centrifuge the tube to separate the serum, allow the Vacutainer™-drawn blood to sit at room temperature for at least 30 minutes, but no longer than 60 minutes.
- The clot should be completely formed within 30 minutes.
- Trauma-induced hemolysis should be minimized if the blood is separated within 60 minutes of collecting the whole blood specimens.
- * Note: For field collections where serum separation is not possible within 60 minutes of collection, store the specimen at 4°C using cold packs, and ship to a laboratory with centrifugation capabilities as soon as possible (ideally less than 24 hours).
2. Separating the Serum
- Centrifuge the specimen before storing or shipping in order to completely separate serum from the blood cells.
- Centrifuge serum according to manufacturers’ instructions for the tube in use.
- After centrifuging the serum, use sterile technique to transfer the serum into a plastic freezing vial with a leak-proof screw-cap (e.g. 2 mL Sarstedt Screw Cap Micro Tube with an O-ring in the lid or equivalent).
- Only ship a portion of the 5mL serum specimen to CDC; retain one or more frozen aliquots as a “backup sample” in case the original shipment is lost or is unsuitable for testing upon arrival at CDC.
- 1 mL is the minimum acceptable volume needed by CDC. If 1 mL of serum is all that is available, please ensure that the entire sample is submitted.
- Label the plastic vial(s) with all of the following:
- Patient name and/or identification number
- Specimen collection date and time
- Whether the sample is an “acute” or a “convalescent” specimen
- Freeze the serum immediately after it has been transferred into the plastic freezing vial(s).
- Store the specimen at -20° C or colder until it is shipped to CDC.
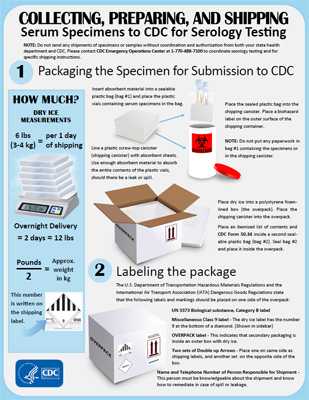 3. Packaging the Specimen for Submission to CDC
- Insert absorbent material (such as absorbent sheets) into a sealable plastic bag (bag #1) and place the plastic vial(s) containing serum specimens into the bag.
- Line a leakproof secondary packaging, such as an appropriate plastic screw-top canister (shipping canister), with absorbent material.
- Use enough absorbent material to absorb the entire contents of the plastic vials, in the event there is a leak or spill.
- Place the sealed plastic bag into the shipping canister.
- Place a biohazard label on the outer surface of the shipping container.
- Place dry ice into a polystyrene foam-lined box (the overpack‡).
- Use at least 6 pounds (~3kg) of dry ice for each day of shipping time; at least 12 pounds (~6 kg) is required for overnight shipment (2 days).
- Divide the weight of the ice in pounds by 2 to get the approximate weight in kg.
- Place the shipping canister into the overpack.
- Place an itemized list of contents and the CDC Form 50.34 inside a second plastic bag (bag #2). Seal and place the bag inside the overpack. Do not put any paperwork in the bag containing the specimens (bag #1) or in the shipping canister.
4. Labeling the Package for Shipment
- The U.S. Department of Transportation Hazardous Materials Regulations and the International Air Transport Association (IATA) Dangerous Goods Regulations state that the following labels and markings should be placed on one side of the overpack:
- The “UN 3373 Biological substance, Category B” marking
- The “Miscellaneous Class 9” label (dry ice label with 9 at the bottom of the diamond)
- This label should include the dry ice marking: “UN 1845 Carbon dioxide, solid (dry ice)” where you must list the weight of the dry ice (in kg) included in the box.
- Divide the weight of the ice in pounds by 2 to get the approximate weight in kg.
- “OVERPACK” – This indicates that secondary packaging has been placed in an outer box with dry ice.
- “Name and Telephone Number of Person Responsible for Shipment” – This person must be knowledgeable about the shipment and know how to remediate in case of spill or leakage.
- Two sets of “Double up Arrows” – Place one set on the same side of the box as the shipping labels, and another set on the opposite side of the box.
‡Overpack is defined by the U.S. Department of Transportation in 49 CFR 171.8, Hazardous Materials Regulations as an enclosure that is used by a single consignor to provide protection or convenience in handling of a package or to consolidate two or more packages.
- Page last reviewed: January 30, 2017
- Page last updated: January 30, 2017
- Content source: