Brock string
A Brock string (named after Frederick W. Brock) is an instrument used in vision therapy. It consists of a white string of approximately 10 feet in length with three small wooden beads of different colors.
The Brock string is commonly employed during treatment of convergence insufficiency and other anomalies of binocular vision. It is used to develop skills of convergence as well as to disrupt suppression of one of the eyes.
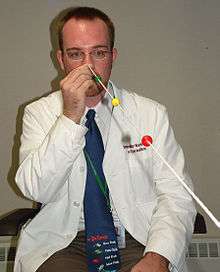
During therapy, the one end of the Brock string is held on the tip of the nose while the other is tied to a fixed point. The three beads are spaced out at various distances. The patient is asked to focus on one of the beads, while noting the visual input of each eye and sensation of convergence. The patient can use variable techniques to make easier or more difficult by bringing the beads closer\further to the nose and by employing lenses and prisms.
Although this procedure is usually associated with binocular vision and anti-suppression therapy, it can also be a valuable procedure for developing accurate fixation skills under binocular conditions.
Three (to five) colored beads are spaced on a length of string at least 20 inch long. The patient is instructed to alternate fixation and focus from one bead to the next while maintaining awareness of physiological diplopia.
Set up
- Tie one end of the string to a doorknob. Position one bead at the end of the cord close to the doorknob. This is the far fixation bead.
- Place the middle fixation bead about 10 inch from you.
- Place the near fixation bead about 4 inch from you.
- Stand directly in front of the doorknob facing it. Hold the cord up to the bridge of your nose so that the cord is stretched tight between your nose and the doorknob.
Procedure
- Look at the near fixation bead. Keep this bead single as you look directly at it. If the near bead is double this indicates an eye teaming problem. if this occurs move the near bead closer or further away until you see it as a single bead_ The near bead should be moved closer and closer as the task becomes easier. Eventually the near bead should be only one inch from the bridge of your nose.
- As you look at the near fixation bead you should see two strings, each of which appears to come from your eyes. if your fixation of the bead is accurate, the two strings should appear to meet exactly at the bead forming an "X"( See illustration). As the bead is moved into one inch from your nose, the two strings should appear to meet exactly at the bead forming a "V".
- Shift fixation to the middle fixation bead and then to the far fixation bead and repeat. if your fixation of the far bead is accurate, the two strings should appear to meet exactly at the bead forming a "V".
- Change the location of the fixation beads and again repeat.
- Try to be aware of other objects in your field of View as you practice.
- Slowly turn your head from side to side through an angle of about 45 degrees maintaining your vision of the two strings at all times.(if you turn too far one string will disappear.)
References
- Scheiman, Mitchell and Wick, Bruce. Clinical Management of Binocular Vision. Lippincott, New York. 1994. pgs 188-192. ISBN 0-7817-3275-1